

This guide highlights some common issues that may occur while deploying AssetSonar’s Discovery Agent across your IT assets and explains how you can fix them for seamless communication of device data into AssetSonar.
Note: Before you begin troubleshooting issues, make sure you’ve installed the AssetSonar Agent in your device. To learn more, read our blog on installing the Agent across Windows and Mac endpoints.
Contents
- Why does the AsssetSonar Agent fail to import IT assets?
- Troubleshooting steps
2.1. Re-install the AssetSonar Agent and input the correct Agent tag
2.2. Ensure that the AssetSonar service is running in the background
2.3. Whitelist AssetSonar’s URL and IP address in your system
1. Why does the AssetSonar Agent fail to import IT assets?
Oftentimes, the Agent gets successfully installed on your machines. However, it fails to fetch IT asset data from the devices, and no IT assets are created in your AssetSonar account. This can be attributed to the following reasons:
- You mistyped the AssetSonar Agent tag during the installation process
- The AssetSonar service is not running in the background of your Windows device
- You have not whitelisted AssetSonar’s URL and IP address in your system
Below, we outline some troubleshooting steps for the optimal functioning of the AssetSonar Agent and a successful import of IT assets in your AssetSonar account.
2. Troubleshooting steps
Step 1: Re-install the AssetSonar Agent and input the correct Agent tag
Mistyping the Agent tag during installation is the most common reason for failed syncs. Your AssetSonar account doesn’t recognize the Agent with a different tag and fails to communicate with it.
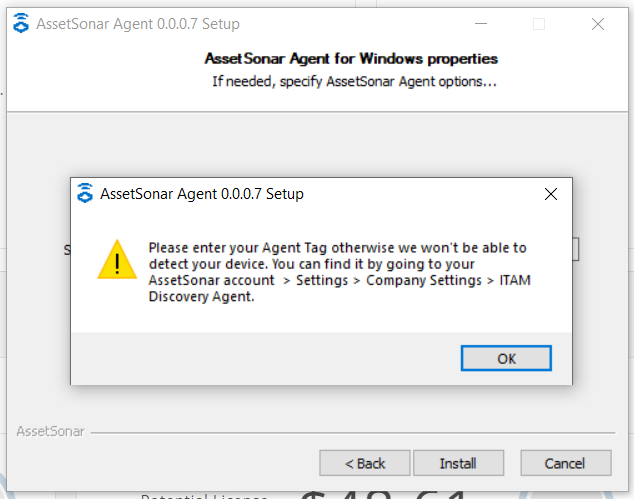
To rectify this, uninstall and delete the previous Agent from your system. Re-download the AssetSonar Agent, copy the Agent tag from the AssetSonar dashboard, and paste it onto the ‘Agent Tag’ field in the AssetSonar installation wizard. Verify that you’ve specified the Agent tag exactly as it is, and re-run the installation.
Note: If you omit any digit(s) while inputting the Agent tag, the installation will not begin by default. You’re likely to receive the following message:
Step 2: Ensure that the AssetSonar service is running in the background
Sometimes, applications such as AssetSonar are prohibited from running in the background of your Windows laptops. This may also prevent the import of IT asset data.
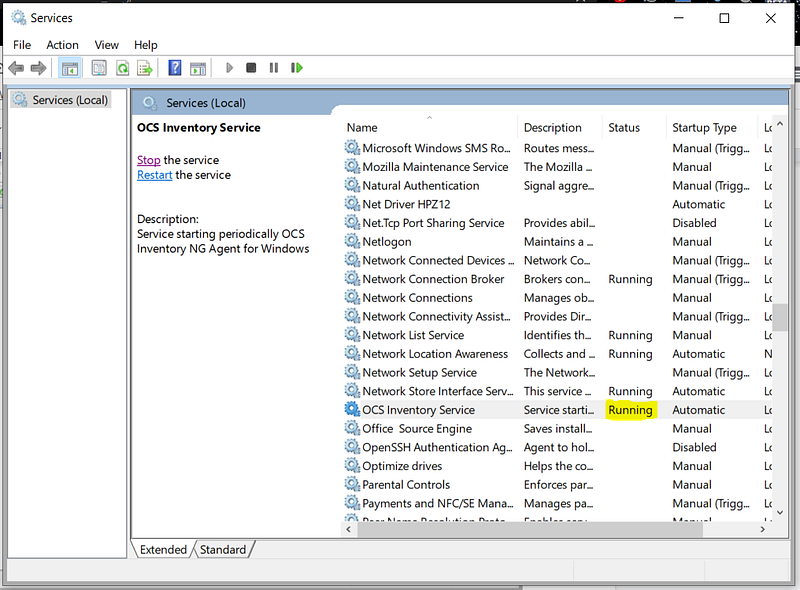
Ensure that the AssetSonar service is running in the background. To do so, open the ‘Services’ App from your Windows search bar, select ‘OCS Inventory Service’, and click on ‘Start the Service’ option as shown below.

Once the application is running in the background, its status will change from ‘ — ’ to ‘Running’.
Note: If the system still fails to fetch your device data, you can uninstall the current version of the Agent and re-install a newer version from the AssetSonar dashboard. Alternatively, you can restart your laptop and the AssetSonar service will start running as a startup task.
Step 3: Whitelist AssetSonar’s URL and IP address in your system
If the two steps mentioned above do not work, you should try whitelisting AssetSonar’s URL and IP address. Contact our team at support@ezo.io for more details.
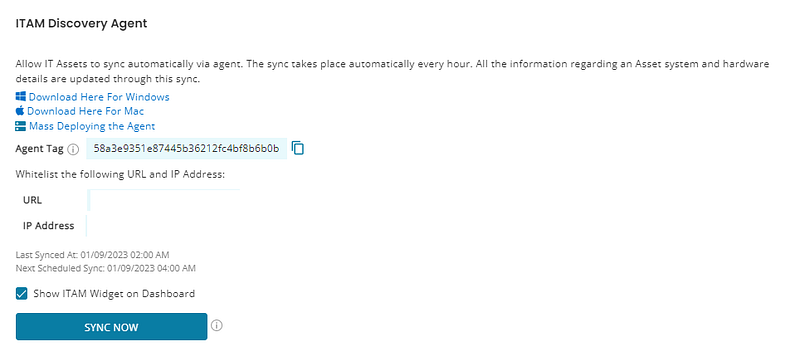
This option is also available on your AssetSonar application. From your Company Settings, you can fetch the URL and IP address that has to be whitelisted.
ping IP_Address(available in company settings)
tracert IP_Address(available in company settings)
Note: You must have Network Administrator privileges to carry out whitelisting.
You are now ready to import IT assets into your AssetSonar account.
If you face any issues during the troubleshooting process or the Agent doesn’t work after the troubleshoot, feel free to reach the AssetSonar Support team.
We typically require the OCS Inventory log file and the Admin.config file for a deep-dive troubleshoot. You can access them from here: C Drive → ProgramData → OCS Inventory NG → OCSInventory.log.
Please email the two files to our Support team. We’re available 24/7 to answer your queries.
Read more: [How-To] Mass Deploy the AssetSonar Agent on your Apple Devices with Jamf Pro
About AssetSonar
AssetSonar is a powerful IT asset management solution used by IT-intensive organizations and businesses all over the globe. Sign up today for a free 15-day trial.
Visit our blog for detailed support posts and additional assistance.
Join the Conversation: Twitter | Facebook


