

AssetSonar supports multiple login options. These include Google Workspace account, Microsoft account, LDAP, and SAML providers. You can configure which login options to give to users from Settings → Company Settings → Authentication. In this article, we’ll discuss SAML.
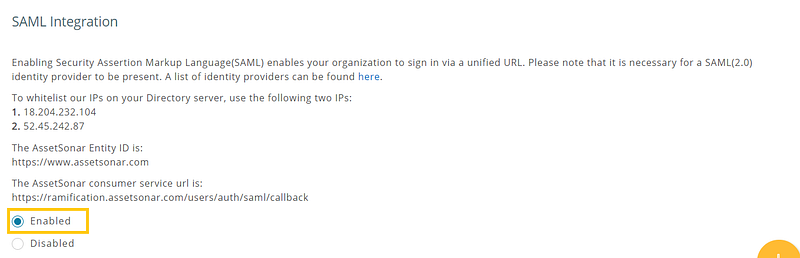
Users in your organization can access AssetSonar through SAML. Now, there’s no need for your employees to remember separate credentials for AssetSonar. To get started, enable the SAML integration from Settings → Add Ons → SAML Integration → Enabled.
Contents
- What is SAML?
- Why implement SAML?
- How SAML works?
- Configuring an Identity Provider for AssetSonar
4.1. Adding the App - Configuring AssetSonar for SAML
5.1. Whitelisting the IPs on SAML
5.2. Add AssetSonar consumer service URL to your SAML settings
5.3. Fill in the configuration settings - Assigning the AssetSonar app to users in OneLogin
- Login experience
- Provision users to a custom role
1. What is SAML?
Security Assertion Markup Language (SAML) is an XML standard that enables a user to log in once to affiliated but separate websites. SAML creates endpoints that give an organization’s users a single URL to sign in and select the applications they are authorized to use. This provides an additional level of security and simplifies user authentication.
One of the main components of SAML include assertions which are:
- Authentication assertion: Validates the user’s identity.
- Attribute assertion: Contains specific information about the user.
- Authorization assertion: Identifies what the user is authorized to do.
2. Why implement SAML?
Reasons to implement SAML include usability, directory integration, and security. A user can access applications with a single click and launch apps from SSO portals. In terms of security, SAML eliminates the use of passwords, centralizes access control, and prevents illegal or unnecessary access from former employees.
3. How SAML works?
SAML SSO works by authenticating a user against the company’s identity provider, say OneLogin or Okta. It transfers the user’s data from one destination to another i.e. from the identity provider to the service provider. In this case, AssetSonar is your service provider.
Your identity provider authenticates the user by creating an XML document containing the user’s credentials and email address. It then signs it using the certificate and sends back the information to AssetSonar.
Some of the Identity Providers supported by AssetSonar are:
– OneLogin
– Okta
– Centrify
– Simplify
– Azure AD
– Auth0
4. Configuring an Identity Provider for AssetSonar
Here, we will be using OneLogin as an example, which provides SSO and identity management for cloud-based applications. With OneLogin, users can enable enterprise-grade SSO over the cloud, allowing all end-users to connect with included SaaS services. For other providers, the steps are similar.
4.1. Adding the custom AssetSonar application
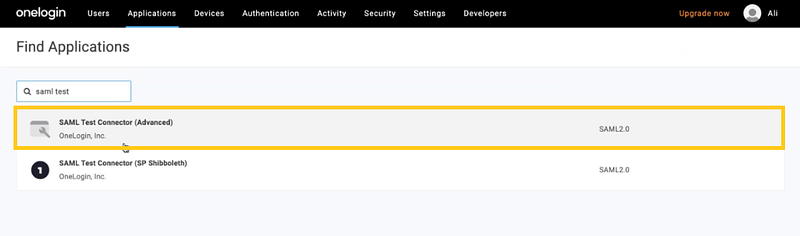
Since AssetSonar is not available on the OneLogin marketplace, you can add it to your OneLogin account in the form of a custom SAML application.
To do so, go to Applications → Add App, search by ‘SAML Test Connector (Advanced), and click on it.
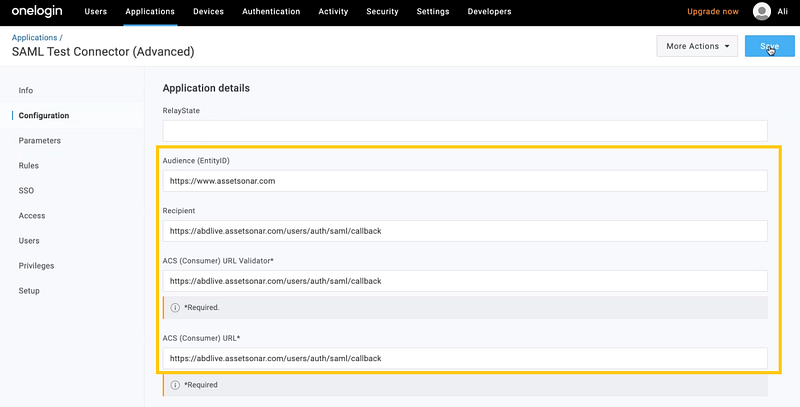
Now, go to the Configurations tab. Here, you can change the Display Name of the SAML Test Connector to your own application’s name i.e. AssetSonar. Click ‘Save’.

Scroll below to the Application Details section and add the following information in the data fields listed below:
- Audience(Entity ID): Copy the AssetSonar Identity ID from AssetSonar → Settings → Add Ons → SAML Integration and paste it into this field.
- Recipient, ACS (Consumer) URL Validator, ACS (Consumer) URL: Copy the AssetSonar consumer service URL from AssetSonar → Settings → Add Ons → SAML Integration and paste it into these three fields.
- Login URL: Paste your AssetSonar account’s login URL (https://<SUBDOMAIN>.assetsonar.com/users/sign_in) into this field.
Here’s how it should look like:
Hit ‘Save’.
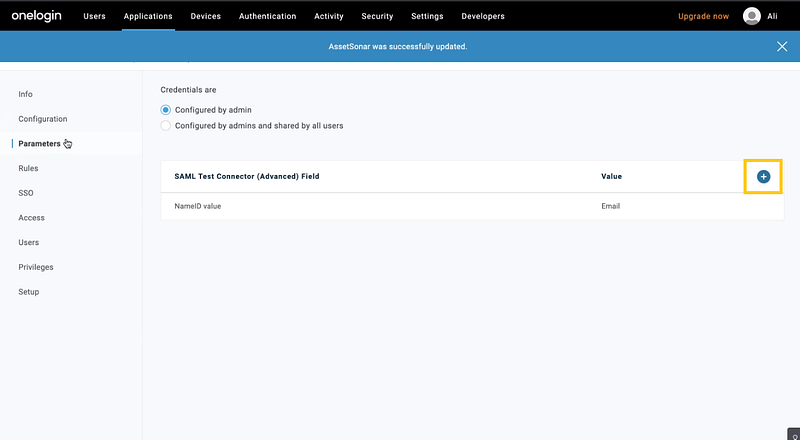
Now, go to the Parameters tab. Here, define the parameters via which you want to configure the SAML integration between AssetSonar and the IdP.
Click on ‘+’ and add the parameters as shown below.
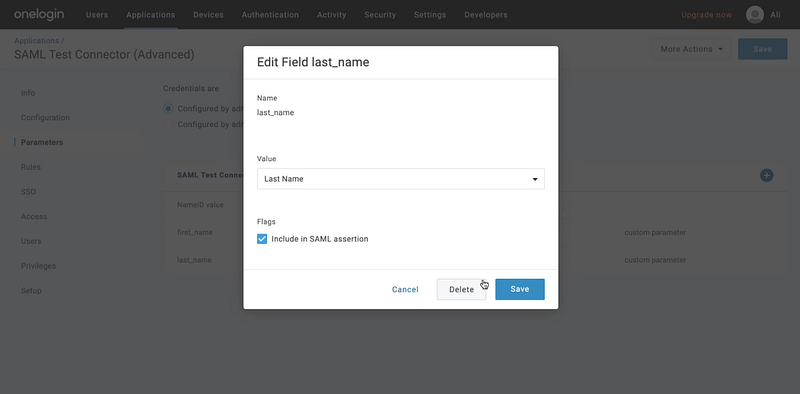
Let’s create the Last Name parameter as an example!
Enter the following:
- Field name: last_name
- Value: Last Name
Select the option ‘Include in SAML assertion’ and hit ‘Save’.
Follow the same steps to add First Name and Last Name as parameters.
Once you’ve added all the parameters, they’ll look something like this:
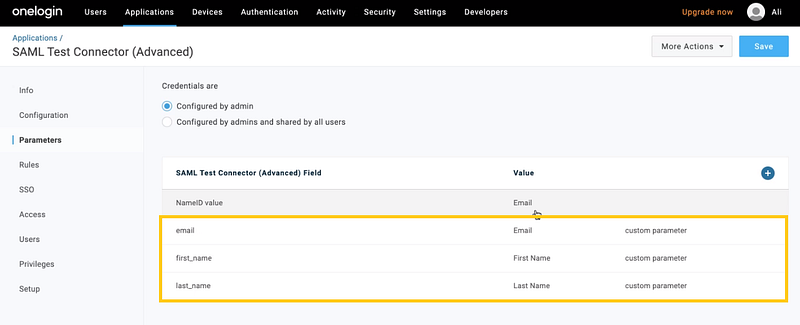
Copy and paste these NameID values of these parameters in the data field (# 5) of Section 5.3.
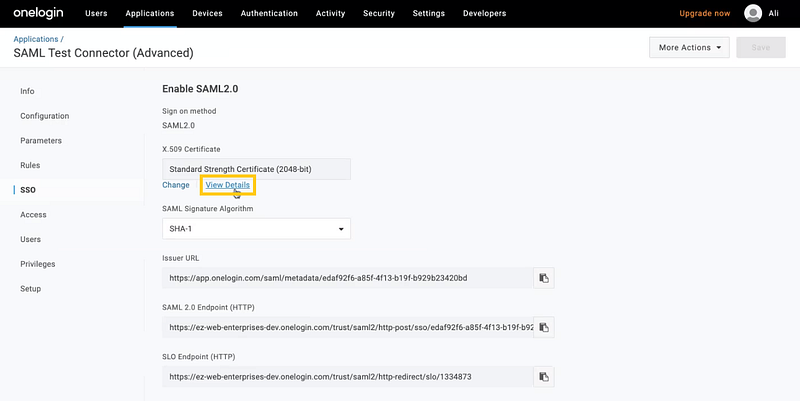
Now, move to the SSO tab. You must copy two details from this tab and paste them onto the data fields in AssetSonar’s SAML integration settings (see Section 5.3).
- SAML 2.0 Endpoint (HTTP): Copy the URL from here and paste it onto the Identity Provider URL field in AssetSonar.
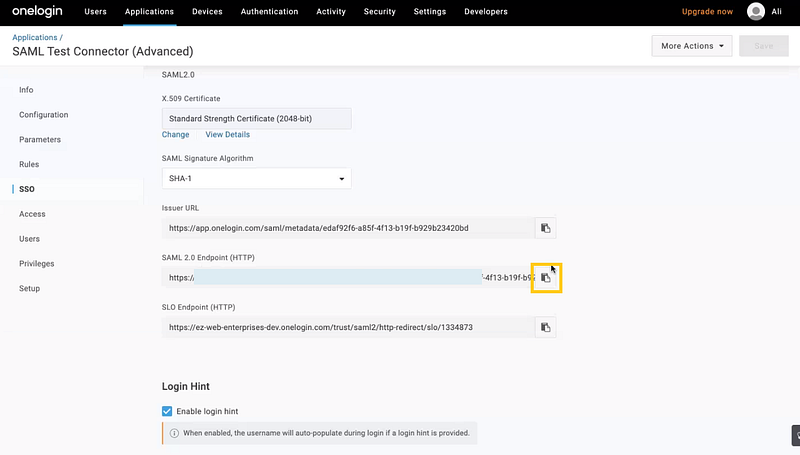
2. Enable SAML 2.0 (X.509 Certificate): Click on ‘View details’. Copy the details of the certificate and paste them onto the Identity Provider Certificate field in AssetSonar.
Configure the rest of the fields in AssetSonar’s SAML integration settings as shown in Section 5.3.
5. Configuring AssetSonar for SAML
Once you have set up the AssetSonar app on your preferred SAML identity provider, configure the settings in AssetSonar from Settings → Add Ons → SAML Integration. Again, we have used OneLogin as an example.
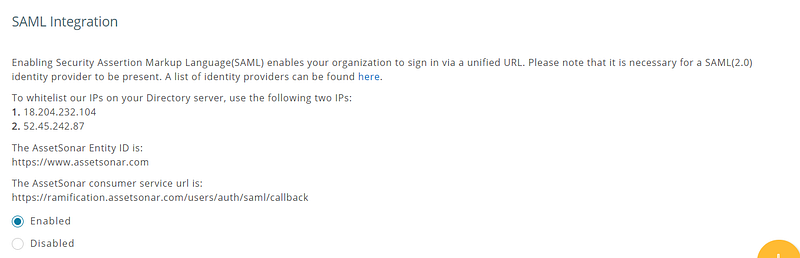
5.1. Whitelisting the IPs on SAML
Some identity providers require IPs to be whitelisted. Make sure that the following two IPs are whitelisted in your SAML settings:
- 18.204.232.104
- 52.45.242.87
5.2. Add AssetSonar consumer service URL to your SAML Settings
The AssetSonar consumer service URL can be obtained from Settings → Add Ons → SAML Integration:
https://<Subdomain>
As mentioned in Section 4.1, paste the AssetSonar consumer service URL to the following fields:
- Recipient,
- ACS (Consumer) URL Validator,
- ACS (Consumer) URL.
5.3. Fill in the configuration settings
The following information needs to be configured in your AssetSonar’s account (see image below to identify the fields):
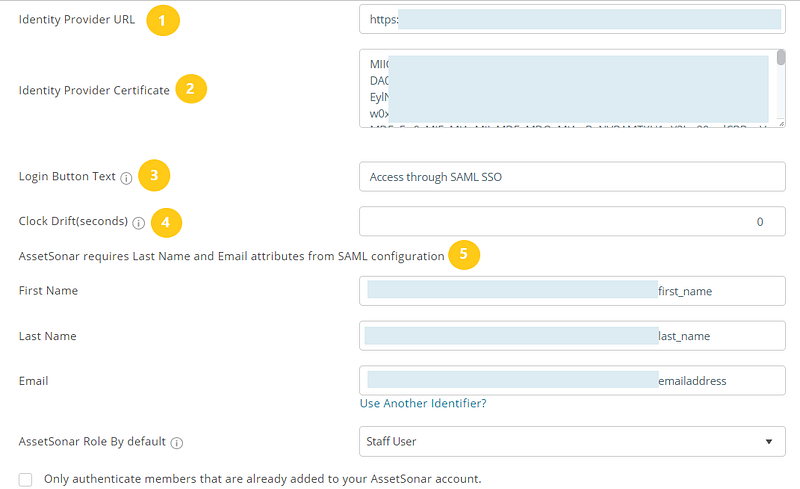
1. Identity Provider URL: Find and copy your Identity Provider URL from Apps → Company Apps → AssetSonar → SSO tab → SAML 2.0 Endpoint (HTTP) (see Section 4.1). You will be required to paste this link in the ‘Identity Provider URL’ field while configuring AssetSonar for SAML integration.

2. Identity Provider X.509 Certificate: Unique for every Account Owner, this certificate is provided by the identity provider. In OneLogin, find and copy your X.509 certificate from Apps → Company Apps → AssetSonar → SSO tab → X.509 Certificate (see Section 4.1). AssetSonar will use the certificate to validate the response from your identity provider letting the user log in using SAML.
Note: Make sure to follow the below format for the certificate when pasting it in the certificate field so AssetSonar validates your identity provider’s certificate without any error. It’s as follows:
— –BEGIN CERTIFICATE — –
your certificate details here
— –END CERTIFICATE — –
3. Login Button Text: By default, it’s labeled as ‘Access through SAML SSO’. You can rename it to any text preferable to you e.g. Access using Acme Corp Login.
4. Clock Drift (seconds): A delay of a few seconds in situations when different time zones are involved to ensure that the response generated by a server remains valid.
5. Attributes required for SAML configuration: First Name, Last Name, and Email attributes need to be present for AssetSonar. These attributes/parameters should be sent over to AssetSonar from your identity provider. In OneLogin, they can be viewed from Apps → Company Apps → AssetSonar → Parameters. Also, map these parameters in AssetSonar. If your Last Name attribute in SAML is last_name, then fill in ‘last_name’ against the Last Name field. The same goes for First Name and Email (see Section 4.1).
6. Scroll up to the top of the Add Ons page in AssetSonar settings, and click ‘Update’. You now have a SAML enabled AssetSonar account.
6. Assigning the AssetSonar app to users in OneLogin
Next, you must assign the AssetSonar application to users who you want to give the SAML SSO login authorization.
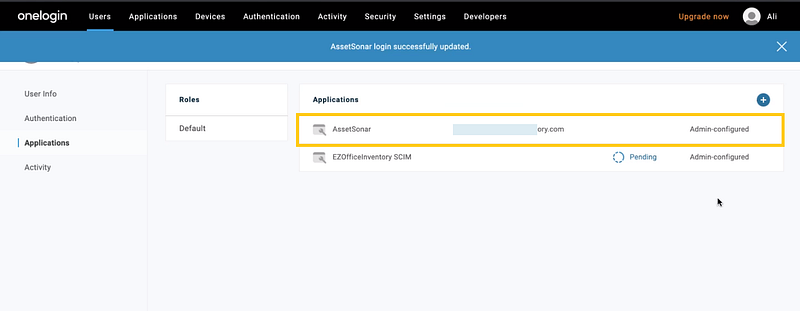
In your OneLogin account, go to Users → User name → Applications tab → ‘+’ → AssetSonar → Add App.
You can see that the application is added to your user info in OneLogin now.
7. Login experience
The following takes place when a user tries to log in to a SAML-enabled AssetSonar account:
– When the user goes to the AssetSonar portal, they see the SAML access option. Below, you can see both the mobile app and browser versions:
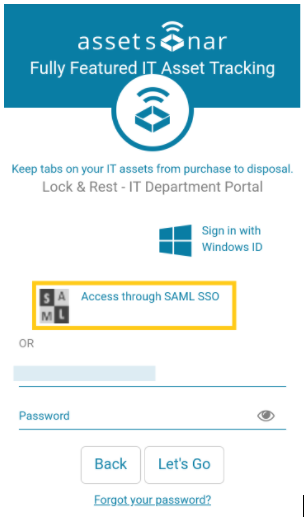
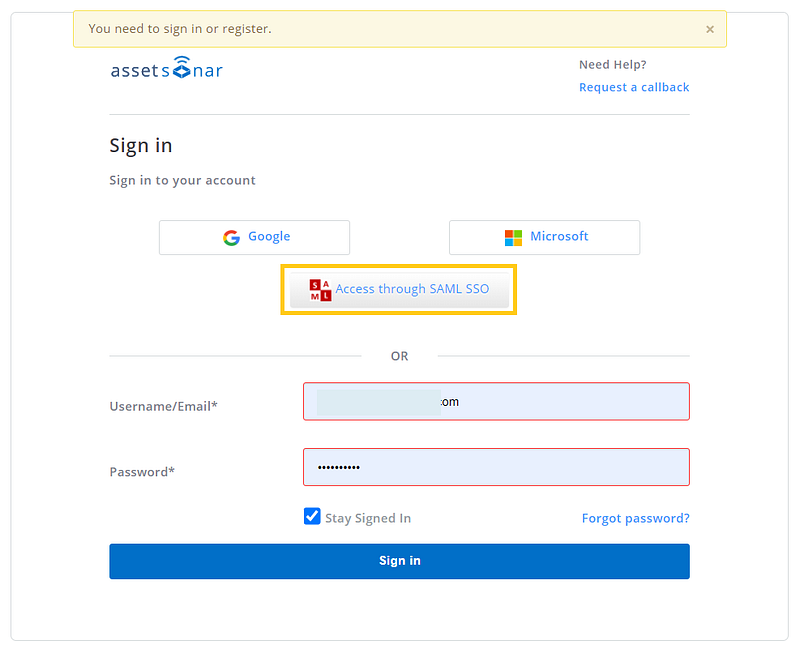
– Clicking Access through SAML takes the user to SAML Provider’s page for authentication.
– If the user is already signed in to the SAML Provider’s account (e.g. OneLogin), they’ll directly land into the AssetSonar portal.
– The email address of the user determines which AssetSonar member they are.
– A user who isn’t added to an AssetSonar account under the Members tab, but accesses that AssetSonar accounts for the first time via SAML, is added as a new staff user.
Note: In a scenario where users might want to use SAML as the only authentication option in AssetSonar, you can disable other options from Company Settings → Authentication.
For AssetSonar’s LDAP integration with Azure AD DS, click here.
Click here to set up SSO for AssetSonar and Microsoft ADFS.
8. Provision users to a custom role
If you want to provision your employees and their respective roles in a way that their hierarchy is reflected in AssetSonar, you can do so by selecting a Default Role that your users will get imported into AssetSonar as.
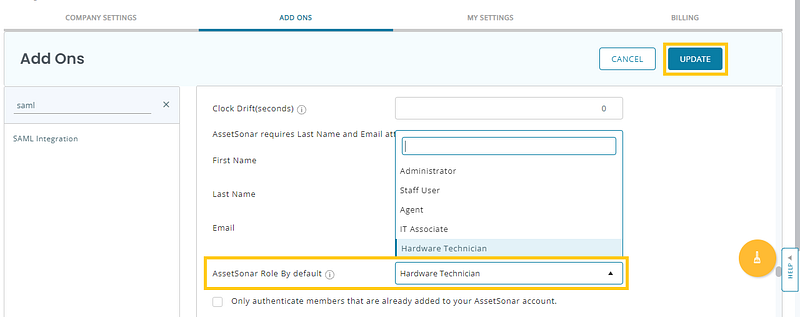
To enable this setting, go to Settings → Add Ons → SAML Integration from your AssetSonar account. Select your preferred custom role as a Default Role into which you want to provision a certain set of employees.
Let’s say, you want to import a set of Hardware Technicians from OneLogin into AssetSonar. Select the following option and hit ‘Update’.
About AssetSonar
AssetSonar is the leading hardware asset management software used by IT-intensive organizations and businesses all over the globe. Sign up today for a free 15-day trial.
For more assistance, drop us an email at support@ezo.io. You can also visit our blog for detailed support posts.


