

![[How-to] Remotely Install the AssetSonar Agent on your Devices Using Jumpcloud](https://ezo.io/wp-content/uploads/2023/10/How-to-Remotely-Install-the-AssetSonar-Agent-on-your-Devices-Using-Jumpcloud.png)
JumpCloud is a Directory-as-a-Service solution that securely connects employees with the SaaS applications they need to do their jobs. It enables IT Admins to manage user access, enforce security policies, and gain visibility into system status from a cloud-based and serverless infrastructure, rather than through legacy, on-premise IT systems.
JumpCloud also offers system management and server access management so you can enforce GPO-like policies or execute commands and scripts against your fleet of Mac, Windows, and Linux endpoints and servers. Leverage command execution to run system checks, compliance reports, software installation, and more.
You can also use the command execution on JumpCloud to mass deploy the AssetSonar Agent across the Windows and Mac endpoints in your organization. Commands can be run on an ad-hoc basis, scheduled or triggered via webhooks across specified platforms.
We have prepared a helpful guide that you can use to remotely install the AssetSonar Agent on your devices if you use JumpCloud as a directory.
Let’s get started!
Contents
- Prerequisites
- Create the command for remote Agent installation
2.1. Creating the command for Mac
2.2. Creating the command for Windows - Launch the remote Agent installation
- Verify command results
1. Prerequisites
Here are a couple of things you need to consider before configuring the commands:
- You must have active systems running on a supported OS to create system policies. See JumpCloud’s Guide on Operating System Compatibility.
- You must specify system groups to create commands. See JumpCloud’s Guide on Managing Groups.
2.Create the command for remote installation
Let’s proceed and create a command for remotely installing the AssetSonar Agent.
To add a new command, log into the JumpCloud Admin Portal. Go to Commands and click the ‘+’ icon as illustrated below.

This shall prompt to open a New Command panel.
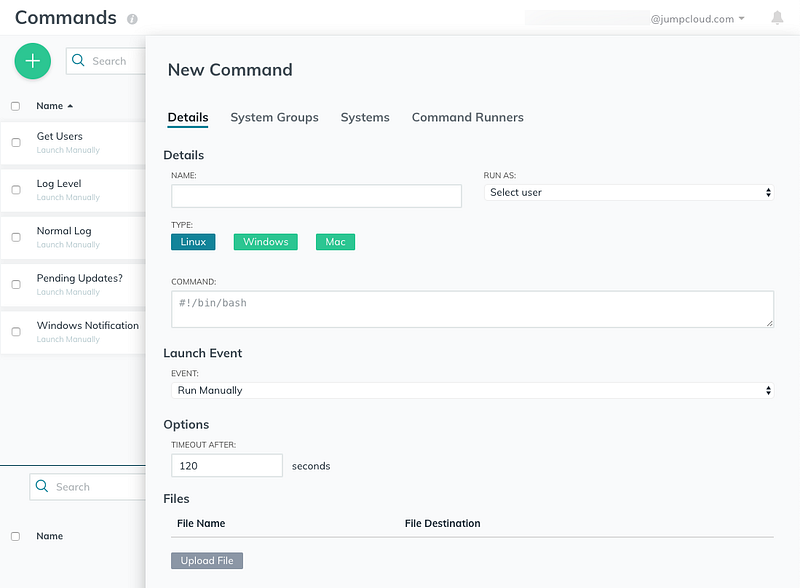
You are now ready to create the command and execute the remote installation.
2.1. Creating the command for Mac
Before you create the command for Mac devices, upload the following files on your public servers. You can choose to upload the files on either a GDrive or a Dropbox account.
- AssetSonar Agent installer (exe.file)
- Modules.conf
- OCSinventory-agent.cfg
- Cacert.pem
- Next_timefile
- OCSinv.adm
- Org.ocsng.agent.plist
Note: You can get these files and a pre-configured AssetSonar Agent for your Mac devices by sending us an email at support@ezo.io.
Now, specify the following details for the command in the New Command panel.
- Enter a Name for the command. Use this name to find the command in the Command list.
- Select the operating system Type: Mac®.
- Select the role or user you want to run the command as (Run As).
- Type or paste the following script into the Command text box.
#!/bin/bash
if [ -e /Applications/AssetSonarAgent.app ]
then
echo “Already Installed”
exit 5
else
curl -O <link_of_publicly_hosted_AssetSonar_agent_package>
curl -O <link_of_modules.conf>
curl -O <link_of_ocsinventory-agent.cfg>
curl -O <link_of_cacert.pem>
curl -O <link_of_next_timefile>
curl -O <link_of_ocsinv.adm>
curl -O <link_of_org.ocsng.agent.plist>
sudo installer -pkg AssetSonar-signed.pkg[Name of file] -target /
sudo cp modules.conf ocsinventory-agent.cfg /etc/ocsinventory-agent
sudo mkdir /private/var/lib/ocsinventory-agent/https:__itam3.assetsonar.com_ocsinventory
sudo cp cacert.pem next_timefile ocsinv.adm /private/var/lib/ocsinventory-agent/https:__itam3.assetsonar.com_ocsinventory/
sudo cp /Users/Shared/org.ocsng.agent.plist /Library/LaunchDaemons
sudo launchctl load /Library/LaunchDaemons/org.ocsng.agent.plist
sudo launchctl start org.ocsng.agent
sudo touch /var/log/ocsng.log
cd /Applications/AssetSonarAgent.app/Contents/Resources
sudo ./ocsinventory-agent
exit 0
fi
Note: The script for remote Agent installation on Mac systems is a bash script. Additionally, make sure that the names of the files and their storage pathways are correctly typed in the script.
5. In the Timeout After field, specify the amount of time (in seconds) after which the command should stop trying to execute. The default timeout value is 120 seconds.
6. Click the System Groups tab to set the specific system groups on which this command will execute. ‘Mac Systems’ in this case.
7. Click the Systems tab to set the specific Mac OS X Systems on which this command will execute.
Note: Be aware that commands only execute on compatible systems. For example, if you connect a Mac command to a Linux system, it won’t run on the Linux system.
8. Optionally, click the Command Runners tab to select a user as a Command Runner with access to run the command. By default, Admins can run commands on all systems.
9. Select preferred Launch Event settings (See Section 3).
10. Click ‘Save Command’.
2.2. Creating the command for Windows
The process of remotely installing the AssetSonar Agent across Windows endpoints is similar to that of Mac devices. Simply follow Steps 1 to 10 from Section 2.1.
However, there are a couple of things you will need to make changes to in this scenario.
- Select the operating system Type: Windows®.
- Select the role or user you want to run the command as (Run As). Commands will run as the LocalSystem account role. Optionally, you can run the command as Windows Powershell.
- Type or paste the following script into the Command text box.
Invoke-WebRequest “https://drive.google.com/uc?export=download&id=<id>" -OutFile ‘c:\windows\temp\assetsonar_agent.exe’ -UseBasicParsing
Invoke-Command -ScriptBlock {
c:\windows\temp\assetsonar_agent.exe /S
}
Note: In order for this to work, the permissions for the link should be such that anyone with the link can download the file — no authorization required. The <id> in the link in the above script should be replaced by the id available in the drive sharable link. For instance, in the link https://drive.google.com/file/d/1axkPO9eYtvEvRRqyz5t85I6t9uR0VfQ/view?usp=sharing, the id would be ‘1axkPO9eYtvEvRRqyz5t85I6t9uR0VfQ’
The script for remote Agent installation on Windows systems is a Powershell script. Additionally, make sure that the names of the files and their URLs are correctly typed in the script.
4. Click the System Groups tab and set it to ‘Windows Systems’ in this case.
5. Click the Systems tab to specify the specific Windows Systems on which this command will execute.
Once the command settings have been configured, you can click on ‘Save Command’. You are now ready to launch the command and install the AssetSonar Agent.
3. Launch the remote Agent installation
You can launch the command for remote Agent installation in multiple ways.
- Run Manually: Commands set to run manually can be executed from the Commands list. To run a command manually, click ‘Run Now’ next to the command’s name in the Commands list.
- Run as Scheduled: Commands set to run as scheduled execute one time on the day and time that you specify on the ‘Schedule Run For’ field. This setting is useful for one-time operations that need to run during a change window.
- Run as Repeating: Commands set to run as repeating execute on the interval you specify.
- Run on Trigger (webhook): Commands set to run on trigger execute when a webhook is received from an external source. Specify the Trigger Name. Learn about command triggers.
4. Verify the installation
Once you have executed the command, the bottom section of the Commands panel will display the exit code as reported by the system. This indicates that the script has been successfully executed.
To further verify if the remote installation has been successful, log into your AssetSonar account and search by the relevant IT assets to see if your Mac and Windows devices have been imported.
Read more: [How-to] Implement User Provisioning via SCIM with AssetSonar and Okta
About AssetSonar
AssetSonar is the leading hardware asset management software used by IT-intensive organizations and businesses all over the globe. It is easy to install and can be mass deployed across your organization’s IT assets using JumpCloud.
For more assistance, drop us an email at support@ezo.io.


