The AssetSonar team offers you a pre-configured AssetSonar Agent for running mass deployment on all the IT devices across your organization. This helps you sidestep the cumbersome process of individually deploying the Agent in each device.
You can use SCCM or GPO to mass deploy the Agent across the Windows devices in your company.
Contents
- Mass deploy the Agent across Windows devices
1.1. Microsoft SCCM
1.2. Group Policy Objects - Mass deploy the Agent across Mac devices
2.1. Using a DMG file
2.2. By hosting files on a shared drive - Deploy the Agent for Linux devices
You first need to install the pre-configured AssetSonar Agent in your own device before you can deploy it on to other devices. To request for a unique pre-configured AssetSonar Agent for your organization, contact our team at support at support@ezo.io.
To learn more about how to install the Agent in a device, click here.
1. Mass deploy the Agent across Windows devices
You can either use Microsoft SCCM or Group Policy Objects (GPO) to mass deploy the AssetSonar Agent across your Windows devices.
Let’s get started!
1.1. Microsoft SCCM
- Open the SCCM application from your Windows search bar.
- In the Configuration Manager console, choose Software Library → Application Management → Applications.
- From the list of applications, select AssetSonar Agent.
- Now, go to the Home tab in the Deployment group and choose Deploy.
- On the General page of the Deploy Software Wizard, select Browse to select the All Systems device collection.
- On the Content page, check whether the Distribution point from which you want devices to install the Agent is selected.
- On the Deployment Settings page, make sure that the deployment action is set to Install, and the deployment purpose is set to Required.
- On the Scheduling page, you can configure when the Agent will be installed. For this example, select As soon as possible after the available time.
- On the User Experience page, choose Next to accept the default values.
- Hit Complete on the wizard.
To learn more, click here.
1.2. Group Policy Objects
You can also deploy the Agent across your Windows devices via Group Policy Objects if you do not use SCCM.
- Request for the AssetSonar Agent’s MSI file from us at support@ezo.io. Download and move it to a shared directory within the network used by your organization.
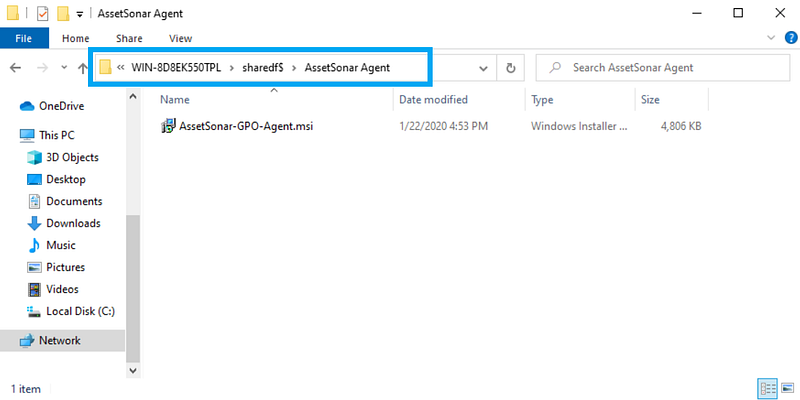
Make sure the domain users have access to the directory in which you place the file.
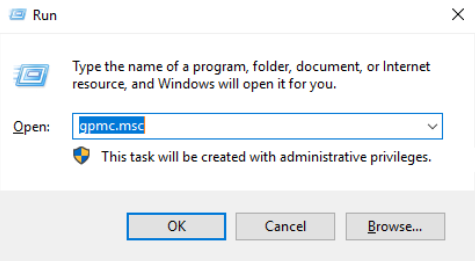
2. Now, hold the Windows key and press ‘R’ to open the Run box. Type ‘gpmc.msc’ and press ‘OK’.
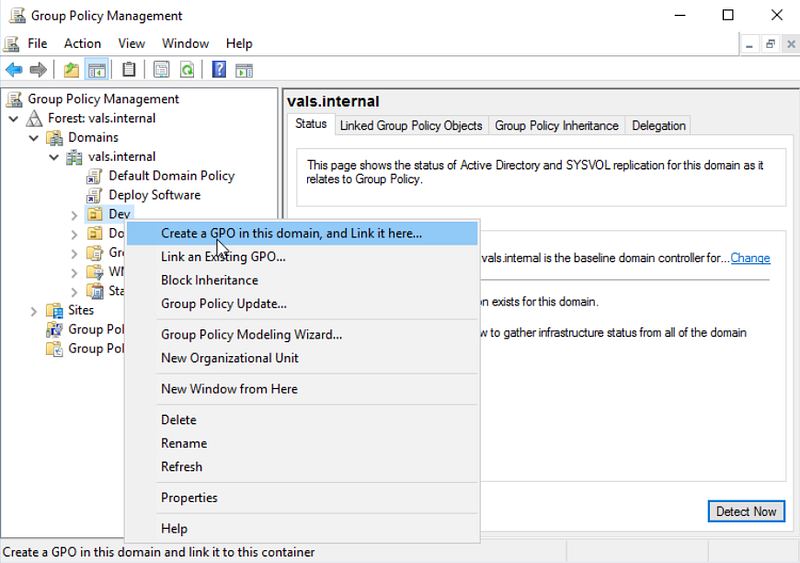
3. This opens up the Group Policy Management panel. Right-click the Organizational Unit you want to deploy the Agent to and select ‘Create a GPO in this domain, and Link it here…’
4. Give a name to the GPO. Let’s say, ‘Software Deployment’ and click ‘OK’.
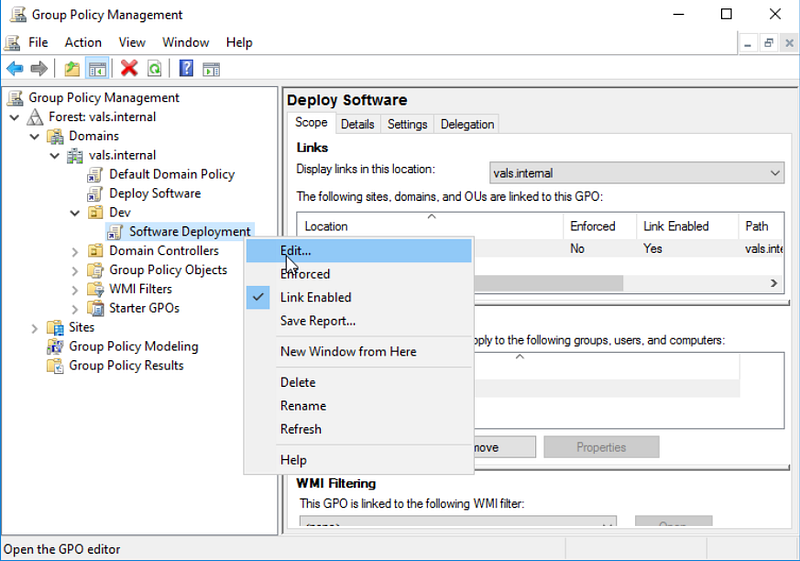
 5. Now, right-click the newly created GPO and select ‘Edit’.
6. This leads you to the Group Policy Management Editor. Go to Computer Configuration → Policies → Software Settings → Software Installation → New → Package.

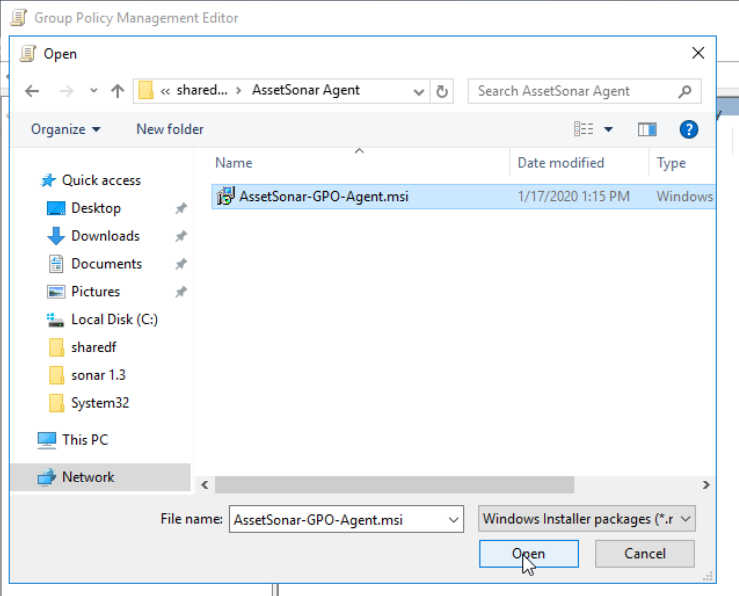
7. Now, navigate to the shared folder where you placed the MSI file from Step 1. Click on the MSI file and hit ‘Open’.
8. Select ‘Assigned’ and then click ‘OK’.
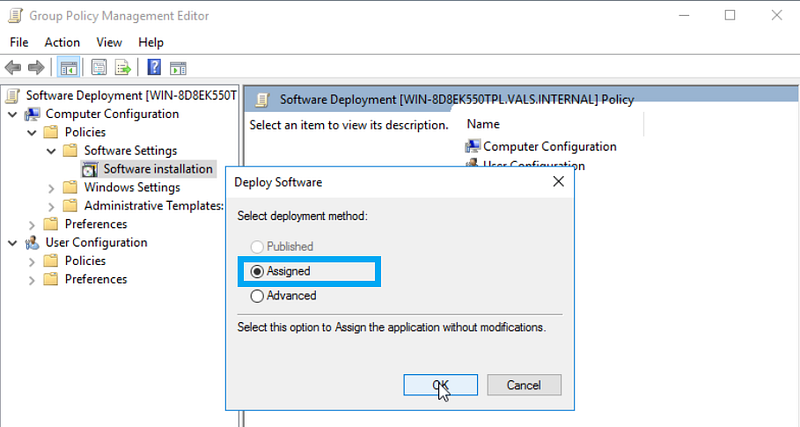
9. The AssetSonar Agent is now visible inside the Editor. It will be automatically installed on all Windows devices inside the specified Organizational Unit once you restart the devices.
To learn more about mass deployment with GPO, click here.
2. Mass deploy the Agent across Mac devices
First, download the .pkg file containing the pre-configured AssetSonar Agent in your own device. You can request a unique pre-configured Agent for your organization by contacting our team at support@ezo.io.
Note that there are two ways to achieve this. You can either mass deploy the AssetSonar Agent using the Agent Package and a DMG file, or you can mass deploy the AssetSonar Agent by hosting the files on a shared drive such as Google Drive or OneDrive.
Note: You can use the DMG method to mass deploy the AssetSonar Agent if you don’t want to upload the AssetSonar Agent to a public server or shared accounts e.g. GDrive or Dropbox.
Method 1: Mass deploy the AssetSonar Agent using the Agent Package and a DMG file
There are three main steps to mass deploying the pre-configured AssetSonar Agent via Jamf Pro.
- Step 1: Upload the AssetSonar Agent and the DMG file to your Jamf Pro account
- Step 2: Add a script for installing the AssetSonar
- Step 3: Create and configure a policy for installing the Agent
Let’s get started with Step 1.
2.1.1. Upload the AssetSonar Agent and DMG file to Jamf Pro
If your master distribution point is the cloud distribution point, you can upload the AssetSonar Agent and the DMG file as a package directly to Jamf Pro. This adds the files to the master distribution point and Jamf Pro. You can get both the Agent package and the DMG file by emailing our team at support@ezo.io.
To do so:
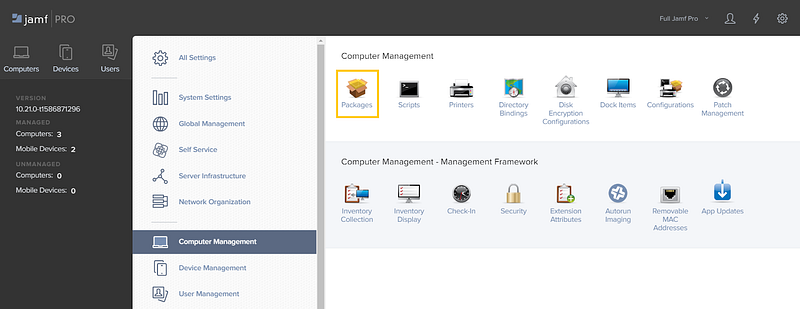
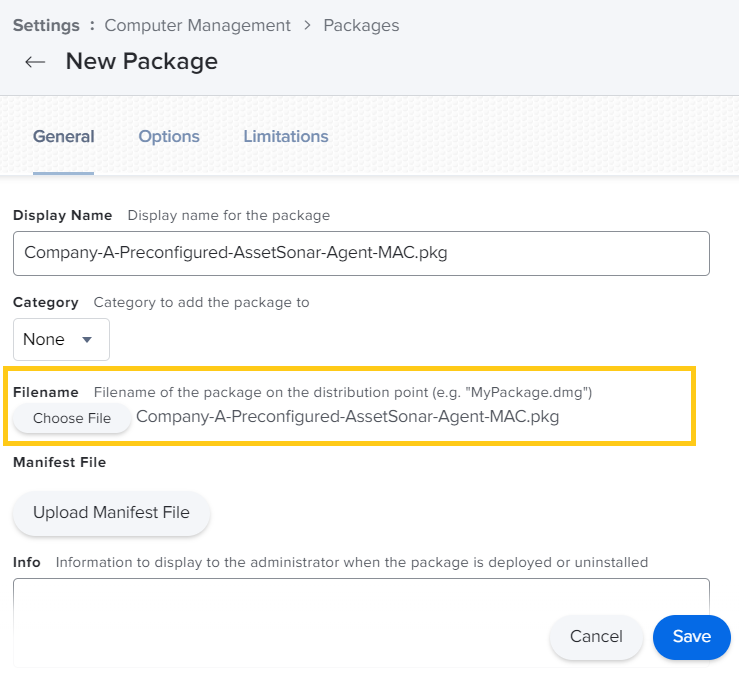
- Log into your Jamf Pro account.
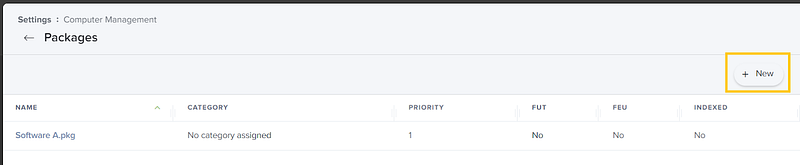
- Now, go to Settings → Computer Management → Packages.

3. Click ‘New’.
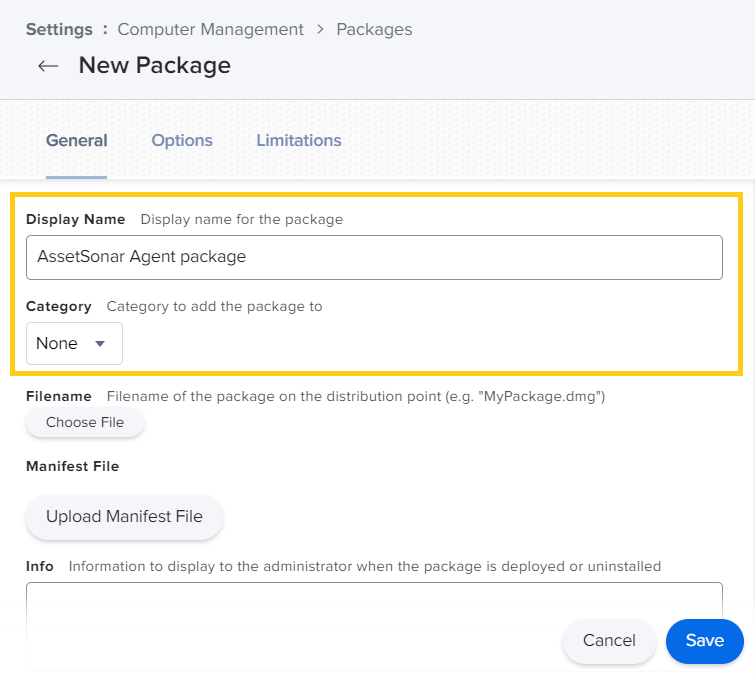
4. Use the ‘General’ pane to configure basic settings for the package, including the Display Name and Category.

Note: If you do not add the package to a category, Jamf Admin displays the package in blue text in the Unknown category.
5. Click ‘Choose File’ to upload the package.

6. Using steps 3 to 5, upload the DMG file to your Jamf Pro account as well.
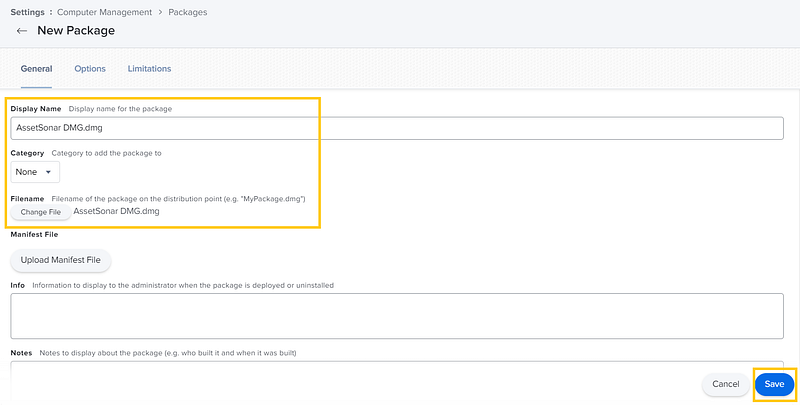
7. Click the Options tab and configure additional settings for the package, including the priority.
8. (Optional) Click the Limitations tab and configure limitations for the package, including operating system and architecture type requirements.
9. Click ‘Save’.
This shall upload the AssetSonar Agent and the DMG file in your Jamf Pro account.
2.1.2. Add a script to install the AssetSonar Agent package via DMG
Next, you need to create a script that prompts the installation of the AssetSonar Agent.
- Go to Settings → Computer Management and click on ‘Scripts’.
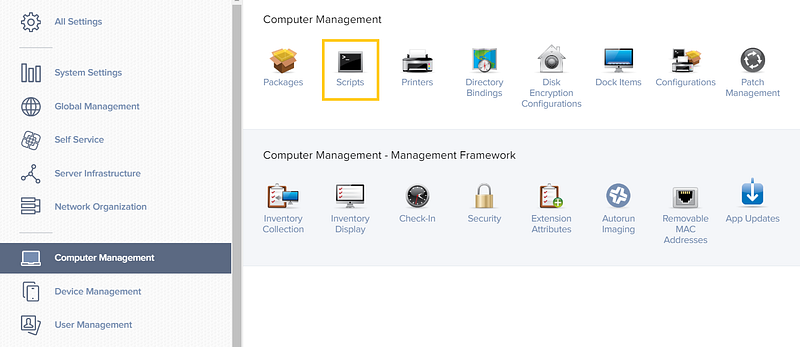
2. Click ‘New’.

3. In the General tab, configure the Display Name and Category.
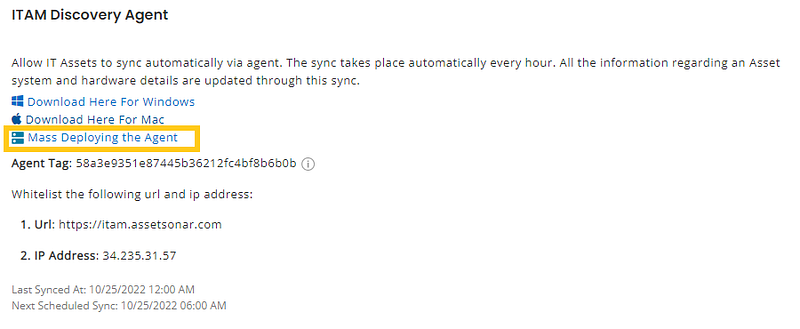
4. In the Script tab, specify the Script Contents (the script must be ‘Shell’). To get this Script, go to Company Settings on your AssetSonar account and click on ‘Mass Deploying the Agent’ as shown below:

Here’s a sample script:
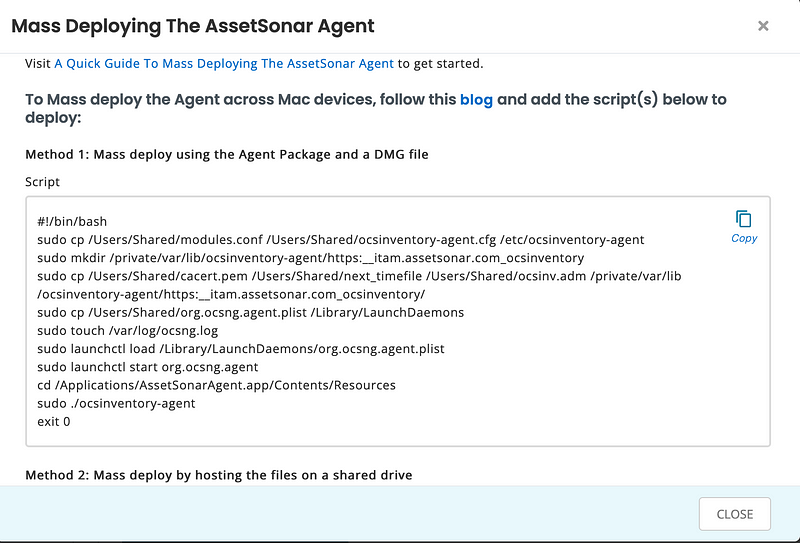
You need to get your own script from the Company Settings and copy-paste it to mass deploy the agent.
Note: if your target drive is a directory other than /Users/Shared, then change all the paths in the script. For instance, if your target drive is /Users/Documents, then you should type /Users/Documents/cacert.pem instead of /Users/Shared/cacert.pem in the script. Do this with all the /Users/Shared. It is recommended to go to your target drive directory and append the desired path in place of /Users/Shared, using the command “pwd”.
5. In the Options tab, set the Priority level.
6. (Optional) Specify Limitations, if any.
7. Click ‘ Save’.
2.1.3. Create and configure a policy for installing the AssetSonar Agent via DMG
Now, you need to create a policy that governs the mass deployment of AssetSonar Agent across all (or selected) Mac devices.
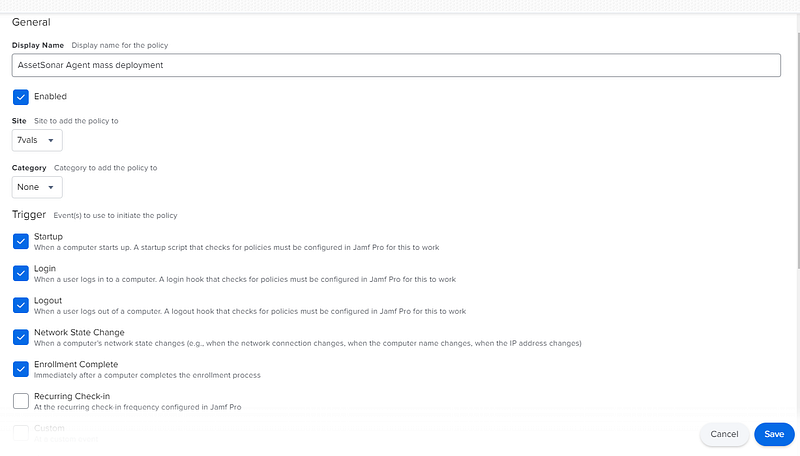
- On your Jamf Pro dashboard, go to Computers → Policies and click on ‘New’.
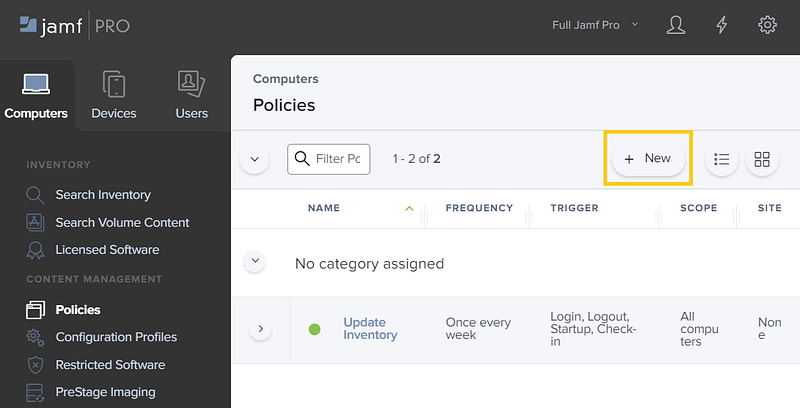
2. In the General section on the Options tab, specify the Display Name, Site, Category, Triggers, Execution Frequency, etc.
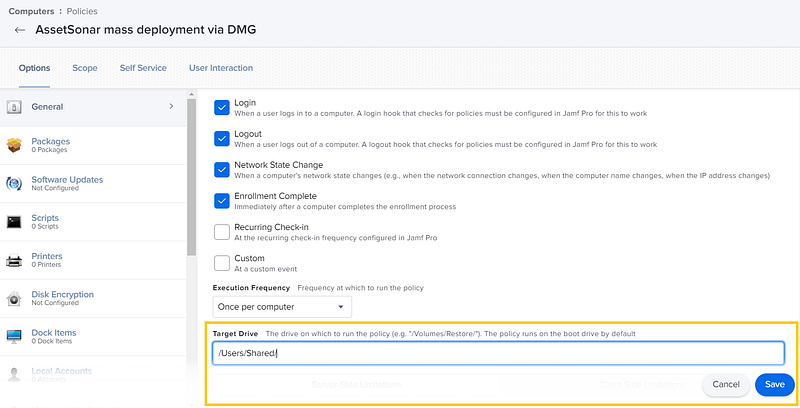
3. Set the Target Drive of the Policy to ‘/Users/Shared’ as shown in the script.
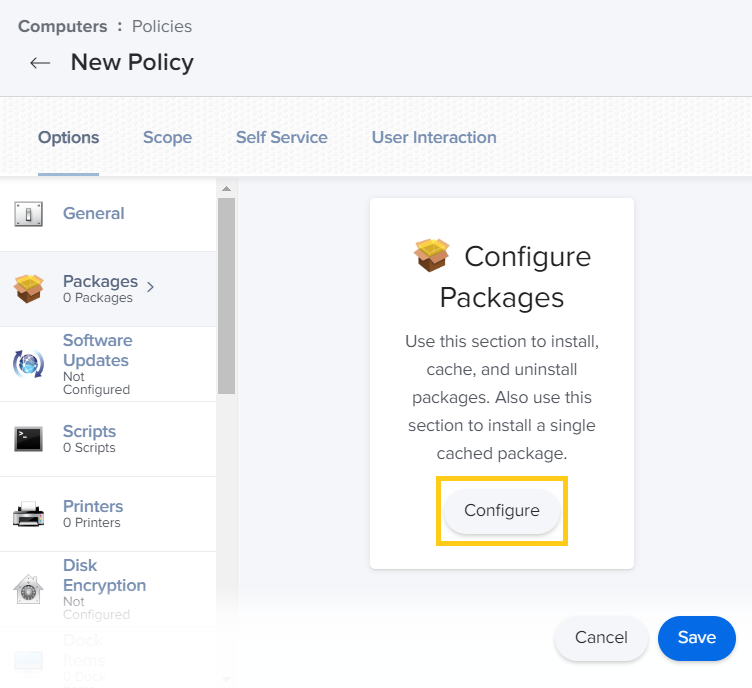
4. In the ‘Packages’ section on the Options tab, click on ‘Configure’.
5. Select the AssetSonar Agent package and click ‘Add’.

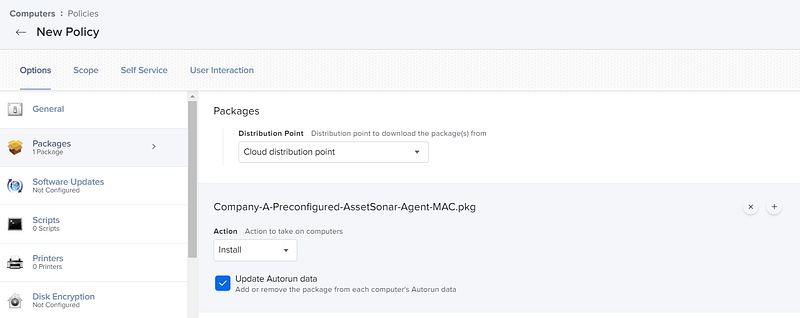
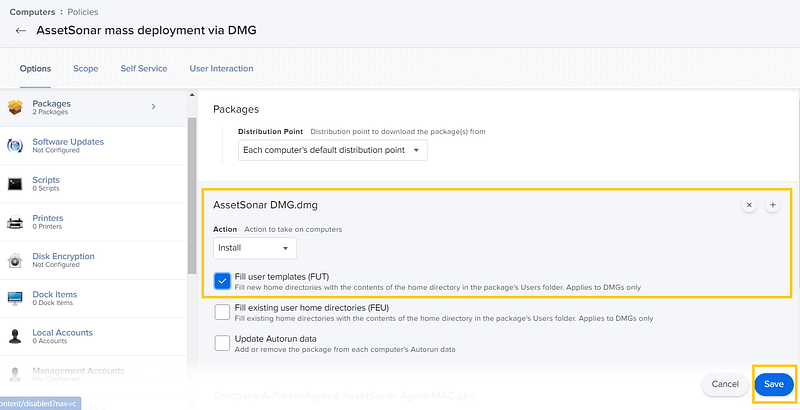
6. After you’ve added the AssetSonar Agent package to the policy, configure the settings as follows. Set Distribution Point to ‘Cloud distribution point’, Action to ‘Install’, and select ‘Update Autorun data’.
7. Repeat steps 4 to 5 to add the DMG package to the Policy as well. Select ‘Install’ as Action and check the ‘Fill user template (FUT)’ option. Hit ‘Save’.
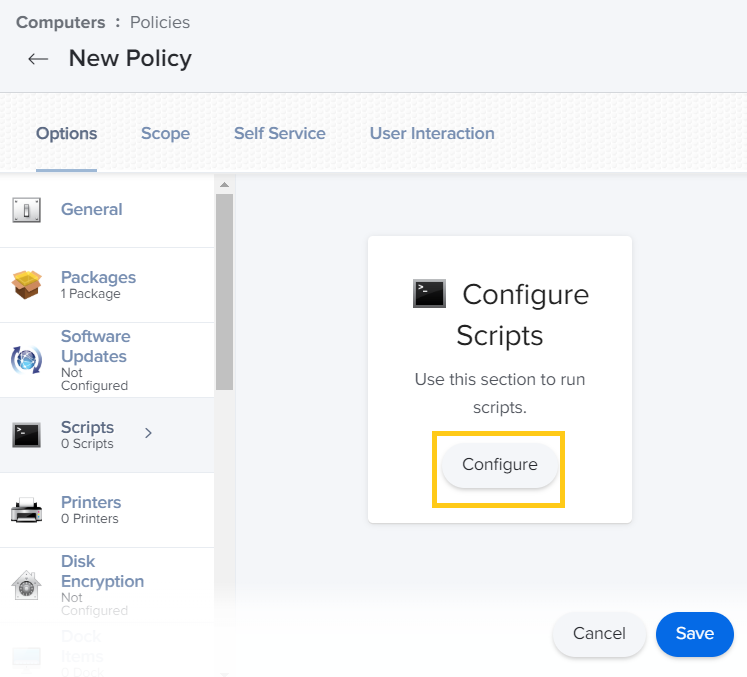
8. Now, go to the ‘Scripts’ section in the Options tab. Click ‘Configure’.
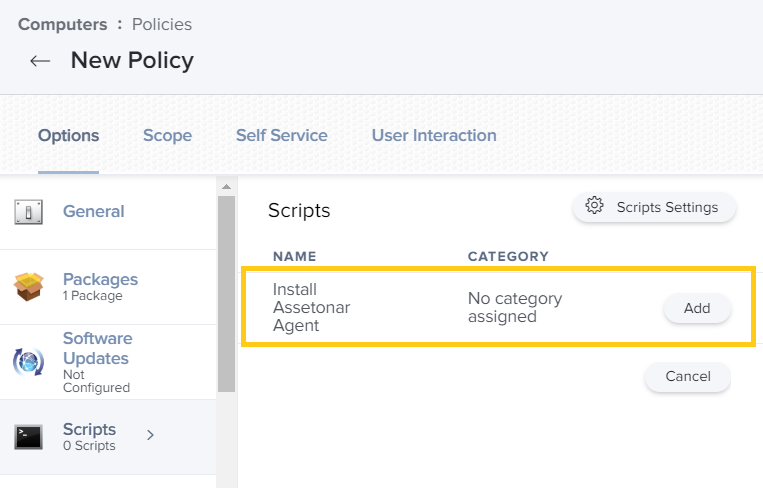
9. Select the relevant script and click ‘Add’.
10. Configure settings in Scope, Self Service, and User Interaction tabs as needed.
11. Click ‘Save’ to save the policy.
Method 2: Mass deploy the AssetSonar Agent by hosting the files on a shared drive
2.2.1. Upload the AssetSonar Agent to Jamf Pro
The AssetSonar team offers a .pkg file of the AssetSonar Agent that you can upload as a Package in your Jamf Pro account. We also provide additional files, whose details you must add in the installation script used to mass deploy the AssetSonar Agent. You can get these files by opening up DMG from your Macbook. Here is a list of the required files:
- modules.conf
- ocsinventory-agent.cfg
- cacert.pem
- next_timefile
- ocsinv.adm
- org.ocsng.agent.plist
Download all these files in your Mac device before you deploy the Agent using Jamf Pro.
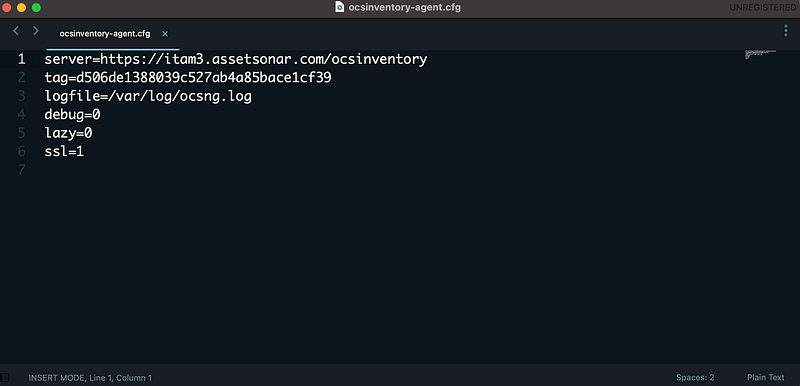
Note: Please make sure that the Tag value in the OCSinventory-agent.cfg file is the same as the Tag value assigned to your company in the AssetSonar account. Here’s an example:
It’s now time to mass deploy the AssetSonar Agent in all the Apple devices used within your organization.
If your master distribution point is the cloud distribution point, you can upload the AssetSonar Agent as a package directly to Jamf Pro. This adds the Agent to the master distribution point and Jamf Pro. To do so:
- Log into your Jamf Pro account.
- Now, go to Settings → Computer Management → Packages.
3. Click ‘New’.

4. Use the ‘General’ pane to configure basic settings for the package, including the Display Name and Category.
Note: If you do not add the package to a category, Jamf Admin displays the package in blue text in the Unknown category.
5. Click ‘Choose File’ to upload the package.
6. Click the Options tab and configure additional settings for the package, including the priority.
7. (Optional) Click the Limitations tab and configure limitations for the package, including operating system and architecture type requirements.
8. Click ‘Save’.
This shall upload the AssetSonar Agent in your Jamf Pro account.
You must also upload the additional files on a public server. You can either host them in a GDrive or a Dropbox account.
2.2.2. Add a script to install the AssetSonar Agent package
Next, you need to create a script that prompts the installation of the AssetSonar Agent.
- Go to Settings → Computer Management and click on ‘Scripts’.

2. Click ‘New’.

3. In the General tab, configure the Display Name and Category.
4. In the Script tab, specify the Script Contents (the script must be ‘Shell’). To get the Script, again go to Company Settings, and click on ‘Mass Deploying the Agent’ as shown below:
A pop-up will appear with two scripts. Copy the Script given in Method 2. Here is a sample Script:
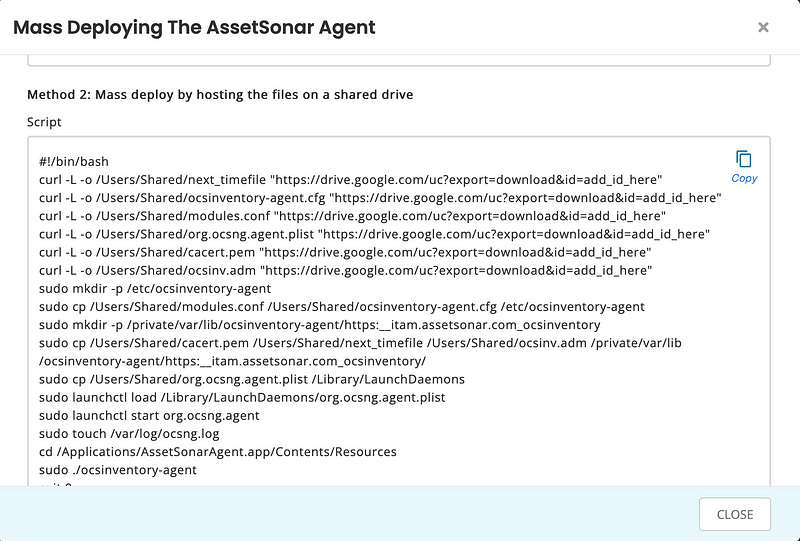
Note: In order for this to work, the permissions for the links should be such that anyone with the links can download the file — no authorization required. The <IDs> in the links in the above script should be replaced by the IDs available in the drive sharable link. For instance, in the link https://drive.google.com/file/d/1axkPO9eYtvEvRRqyz5t85I6t9uR0VfQ/view?usp=sharing, the ID would be ‘1axkPO9eYtvEvRRqyz5t85I6t9uR0VfQ’. Additionally, make sure that the names of the files and their storage pathways are correctly typed in the script
5. In the Options tab, set the Priority level.
6. (Optional) Specify Limitations, if any.
7. Click ‘ Save’.
2.2.3. Create and configure a policy for installing the AssetSonar Agent
Now, you need to create a policy that governs the mass deployment of AssetSonar Agent across all (or selected) Mac devices.
- On your Jamf Pro dashboard, go to Computers → Policies and click on ‘New’.

2. In the General section on the Options tab, specify the Display Name, Site, Category, Triggers, Execution Frequency, etc.

3. In the ‘Packages’ section on the Options tab, click on ‘Configure’.

4. Select the AssetSonar Agent package and click ‘Add’.

5. After you’ve added the AssetSonar Agent package to the policy, configure the settings as follows. Set Distribution Point to ‘Cloud distribution point’, Action to ‘Install’, and select ‘Update Autorun data’.

6. Now, go to the ‘Scripts’ section in the Options tab. Click ‘Configure’.

7. Select the relevant script and click ‘Add’.

8. Configure settings in Scope, Self Service, and User Interaction tabs as needed.
10. Click ‘Save’ to save the policy.
Once the policy has been created, you need to prompt either of the specified triggers identified to initiate the mass deployment of the AssetSonar Agent.
One way to do this is to restart all the Mac devices for which the policy had been created. The AssetSonar Agent shall be deployed in all the concerned devices as soon as users log into them.
To learn more about mass deployment with Jamf Pro, click here.
3. Deploy the Agent for Linux devices
You will need the following to successfully install and run the AssetSonar Agent in your Linux devices:
- An active AssetSonar (subscription/trial) account. If you don’t have a subscription or trial account, register here.
- A Debian-based Linux PC with versions including but not limited to the following: Ubuntu 18.04, Ubuntu 20.04, and Kali 2020.1.
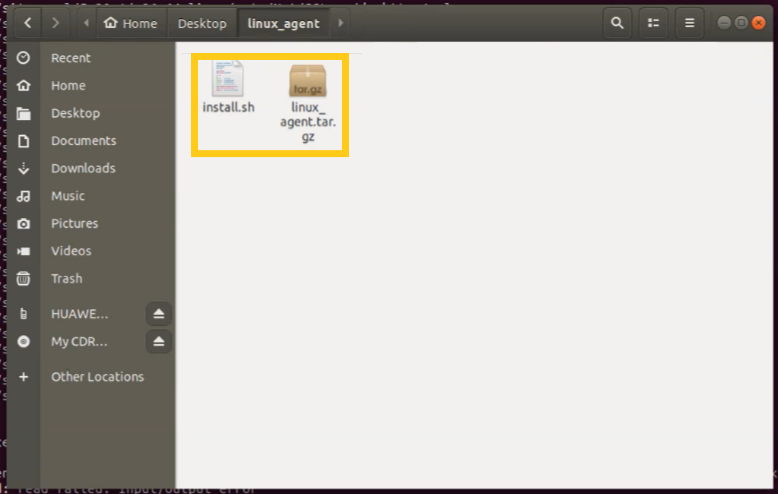
- The AssetSonar Agent package. This consists of a tar.gz file and a bash script “install.sh” that installs the tar.gz file. You can get it from us at support@ezo.io.
- The AssetSonar Agent tag to feed into the terminal for installation script.
Note: If you want to install the Agent for other versions of the Linux OS, send us an email at support@ezo.io. We’ll have a pre-configured Agent ready for you.
For a seamless installation process, it is recommended that you restart your PC before installing the AssetSonar Agent.
Let’s begin with installing the Agent in your Linux device. Follow these steps:
- Download the AssetSonar Agent package you just got from us on your computer’s desktop. It contains the ‘tar.gz’ file and the installation script as shown:
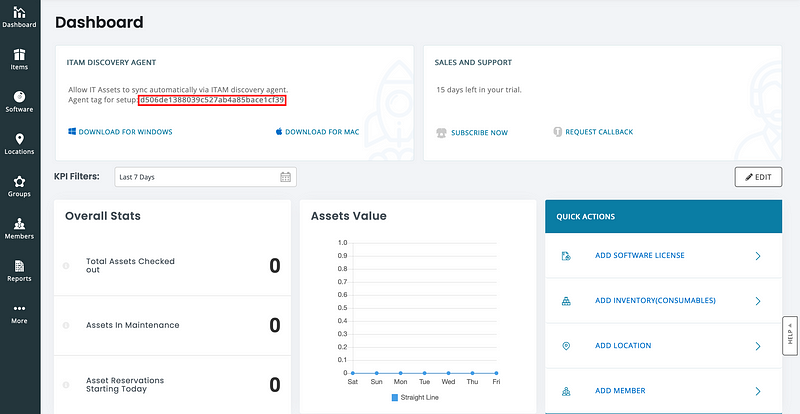
2. Open your AssetSonar account to retrieve the Agent tag from Settings → Company Settings → ITAM Discovery Agent.

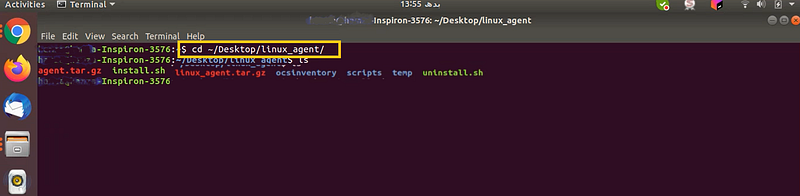
3. Now, open the terminal of your Linux device and navigate to the ‘linux_agent’ package by typing ‘cd ~/Desktop/linux_agent/’. This will open up the folder and its contents in the terminal.
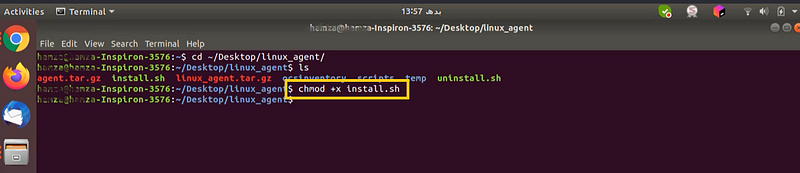
4. Make the installation file executable by typing in the command ‘chmod +x install.sh’.
5. Now, run the command ‘sudo ./install.sh <package_path> <agent_tag>’ to open the installation script. Copy the Agent tag from Step 2. Paste the two values in the order shown, and hit ‘enter’.
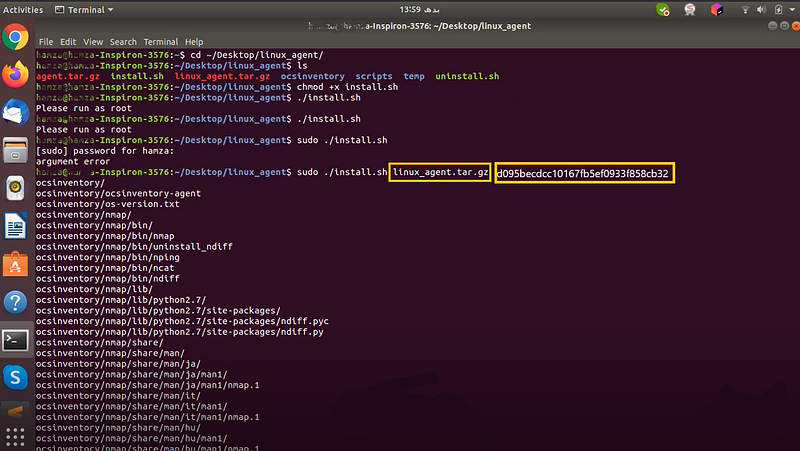
This will install the AssetSonar Agent in your Linux device.
Note: Remember to prepend ‘sudo’ to the command you want to run. This gives you the root privilege to execute the command.
Warning: The Agent is installed to the directory ‘opt/ocsinventory’ and will delete all files in the directory if it already exists. It will also remove any cron jobs for OCS inventory in the crontab.
To learn more about mass deployment on Linux devices, click here.
About AssetSonar
AssetSonar is a powerful IT Asset Management solution used by IT-intensive organizations and businesses all over the globe.
Sign up today for a free 15-day trial.
For more assistance, drop us an email at support@ezo.io. You can also visit our blog for detailed support posts.