

AssetSonar integrates with Open-AudIT to tell you what is on your network, how it is configured, and when it changes. Open-AudIT is a discovery, audit, and asset tracking system designed to be run on a server. It intelligently scans an organization’s network and stores the configurations of discovered devices such as routers, switches, printers, computers, etc.
Our integration with Open-AudIT enables you to find and quickly identify connected devices on your network and map your IT landscape with automated network scans. Tie in your network assets with the advanced ITAM and ITSM capability of AssetSonar. Track custody and location management of network devices, implement incident and change management on them, and run detailed reports to identify key network utilization metrics.
The AssetSonar team has prepared a detailed step-by-step guide so you can implement AssetSonar’s Open-AudIT integration and fetch your network devices into AssetSonar.
Note: We only support and recommend you use Open-AudIT’s Community version.
There are two ways to install and run the Open-AudIT software and its Connector application:
- On Windows server
- On Linux server
While deploying the integration, please make sure you’re following the steps pertaining to your relevant server (Windows or Linux).
Let’s get started!
Contents
- Prerequisites
- Run network discovery on Open-AudIT
2.1. Install Open-AudIT
2.2. Add credentials
2.3. Create discovery
2.4. Execute discovery - Install AssetSonar’s Open-AudIT Connector
3.1. For Windows server
3.2. For Linux server - Provision Devices into AssetSonar
4.1. Ignore recommendations - Run Custom Reports
1. Prerequisites
Before you get started, you will need the following to successfully run network discovery with AssetSonar and Open-AudIT:
- Nmap from nmap.org/download.html (See 2.1.1.).
- The AssetSonar-OpenAudIT Connector application for running on your Windows or Linux server. Email our support team at support@ezo.io (See 3).
- Ruby 2.2 or higher for running the Connector application on your Linux server (See 3.2).
- You must comply with certain hardware, OS, browser, and server requirements to successfully install Open-AudIT across your IT devices. Learn more about them here.
2. Run network discovery on Open-AudIT
2.1. Install Open-AudIT
2.1.1. For Windows Server
Before you install Open-AudIT on a local server, you must first install Nmap by going to the following website: nmap.org/download.html. Scroll below and you’ll see an installer file titled ‘nmap 7.92-setup.exe’ in the Microsoft Windows binaries section.
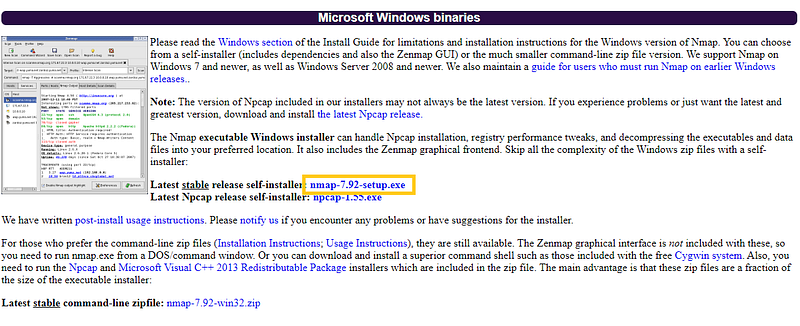
Click on it and complete the installation setup using the default options.
Note: Nmap is a prerequisite for Open-AudIT. Open-AudIT will not run properly if you do not install Nmap.
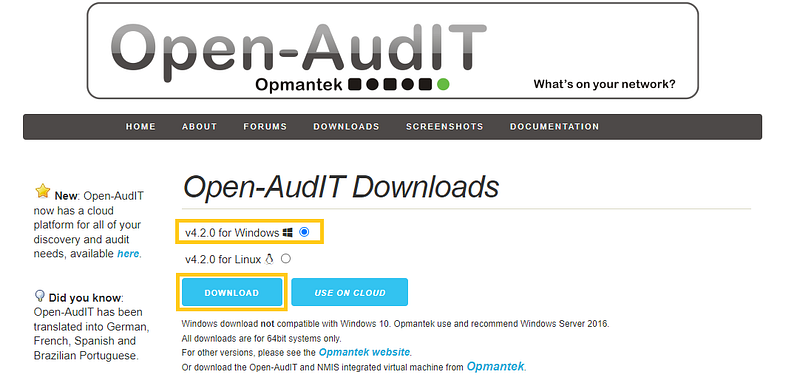
Now, install Open-AudIT from open-audit.org/downloads.php. Select Windows as your preferred version and click on ‘Download’.
Note: Rather than double-clicking it, you need to right-click the installer file and run it as Administrator for Open-AudIT to install successfully.
Carry out the default steps to install the Open-AudIT application on your server.
As a best practice, from your Computer, go to the Services (App) → Apache2.4 and right-click to Properties. Go to the Log On tab and switch it from the Local System account to the account that you’re logged in from by adding its respective credentials so Services can use Open-AudIT.
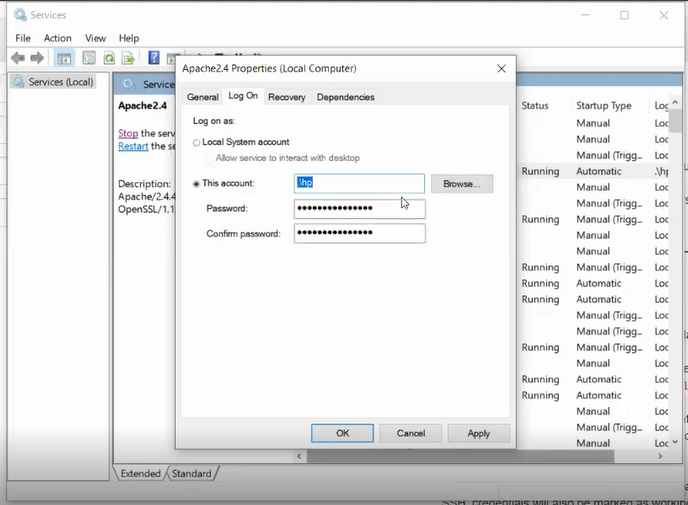
Click OK → Apply to save settings.
2.1.2. For Linux server
Simply, install Open-AudIT from open-audit.org/downloads.php. Select Linux as your preferred version and click on ‘Download’.
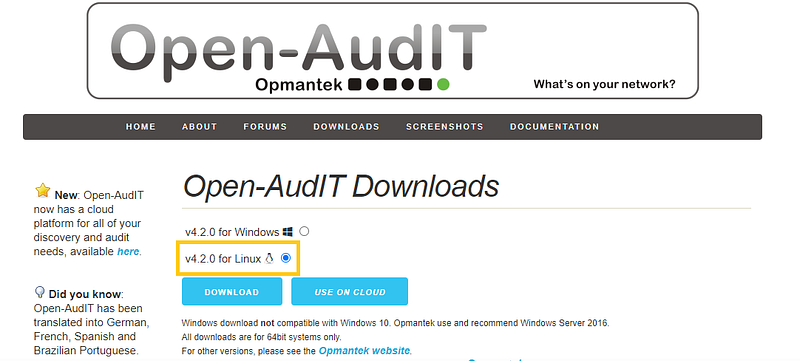
Note: Remember to download the Community version as highlighted below.
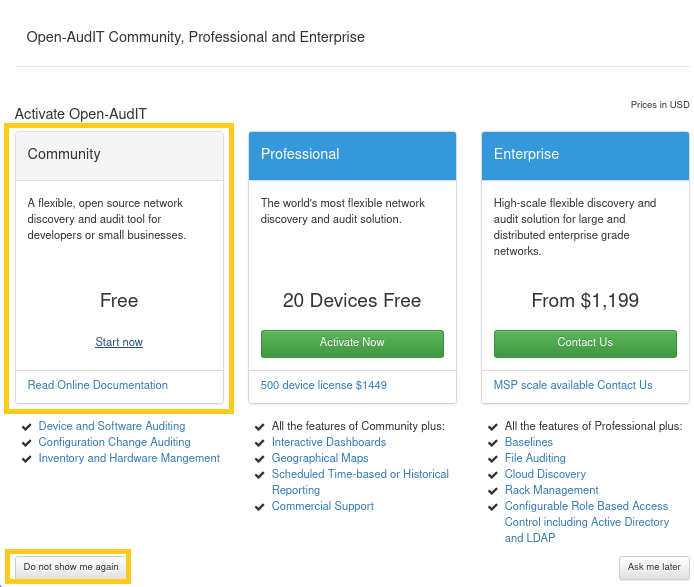
Click ‘Do not show me again’ so the system doesn’t ask you to specify the Open-AudIT version repeatedly.
Make the downloaded file executable by running the following command: chmod +x <filename>
2.2. Add credentials
Once the Open-AudIT installation is complete, access it from your browser with the URL: localhost/open-audit/index.php/logon. Enter the default credentials suggested by Open-AudIT which are as follows:
- Username: admin
- Password: password
Note: For robust network security, it is recommended that you change the default credentials suggested by Open-AudIT.
Now, you need to add credentials of the set of Devices that you intend to scan from your organization’s network. In your Open-AudIT account, go to Discover → Credentials → Create Credentials.

Add details such as Name, Description, Type, Username, and Password.
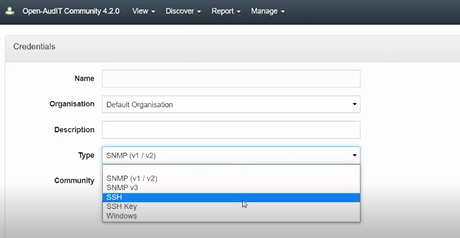
There are three primary types of Devices that you need a different set of credentials for:
- SNMP: An SNMP device is a device that is managed using Simple Network Management Protocol (SNMP). It may include common network devices like routers, switches, firewalls, load balancers, storage devices, UPS devices, and printers. You need to add the community string for SNMP devices i.e. ‘public’ in place of credentials.
- SSH: Also known as Secure Shell or Secure Socket Shell, SSH is a network protocol that gives users, particularly system administrators, a secure way to access computers over a network. Add the SSH Key for accessing data from Macbooks and Linux running on your network.
- Windows: Devices based on Windows OS. Add your System Admin credentials to access data of Windows devices.
Based on your company policies, you can also keep and input individual passwords for separate Devices. Although, this won’t be efficient enough. Pro tip! If you’re using an Active Directory (AD), you can add credentials for the administrators in the AD and that will be sufficient to scan all machines.
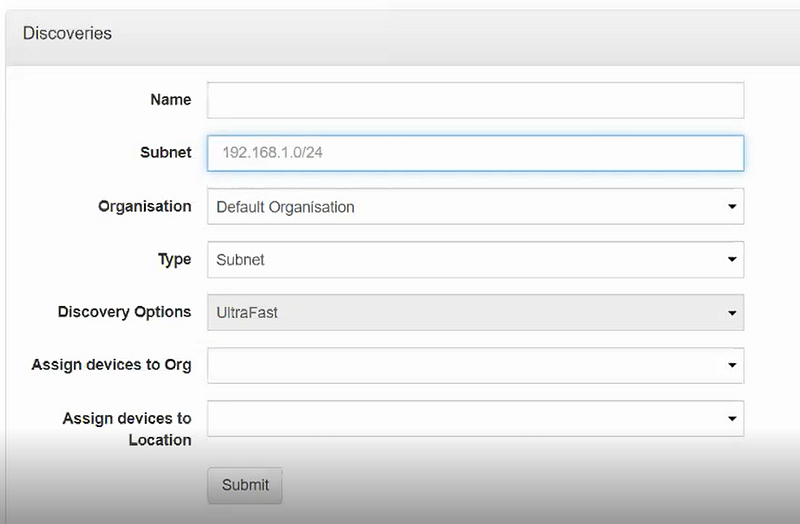
2.3. Create discovery
After you’ve set up the credentials, you can create a discovery. Discoveries are Open-AudIT’s way to scan a network and pull in information from it using the credentials you’ve already given. If they cannot extract in-depth information, they’ll get some surface-level information such as the Name of the Devices and their IP and MAC Addresses.
Go to Discovery → Discoveries → Create Discovery.

Add the relevant details and hit ‘Submit’.
2.4. Execute discovery
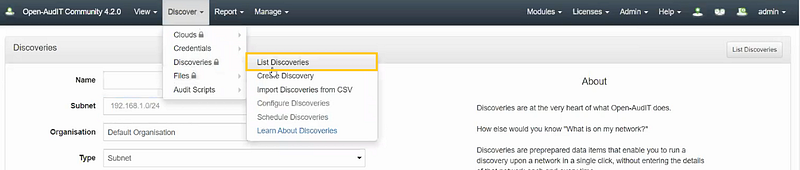
After you’ve set up a discovery, you can go ahead and view it from Discovery → Discoveries → List Discoveries.
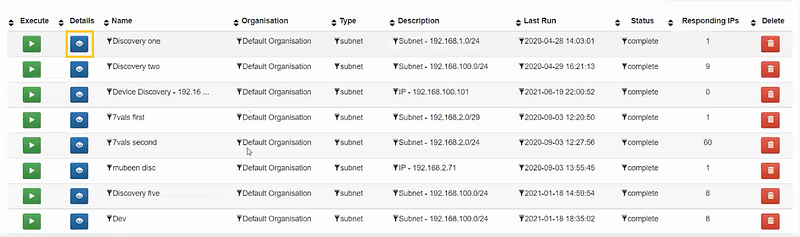
This is how the list of different discoveries looks like. Click on the highlighted icon to open a specific discovery.
Next, run the discovery by clicking ‘Execute’.The system will then show you a log.
The length of discovery typically depends on how many Devices you’re scanning but it generally takes 5 to 15 minutes. Once it is done, Open-AudIT will store all the gathered information locally on the server where it was initially installed.
With our intelligent integration, you can also schedule Discoveries from within AssetSonar. Let’s move on to the AssetSonar part of it!
3. Install AssetSonar’s Open-AudIT Connector
To connect AssetSonar with Open-AudIT, the AssetSonar team has made a Connector application, each for installing on the following servers:
- Windows
- Linux
You can request the pre-configured Connector application if you are using any previous versions of Open Audit by emailing our support team at support@ezo.io. For users using version 5 or the latest Open Audit, no email request is required.
Let’s look at the two methods of installing the Connector application!
3.1. For Windows server
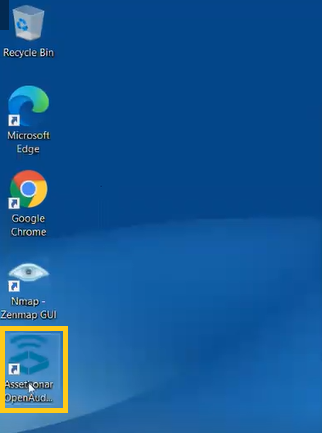
Once you’ve installed the application, you will get an icon on your desktop by the name ‘AssetSonar Open-AudIT Connector’ as shown below.
Please note that our Windows-based Connector application is specifically going to work well on a Windows server. We do not support its installation on Windows 10 Home or Professional computers.
Next, open the Connector application.
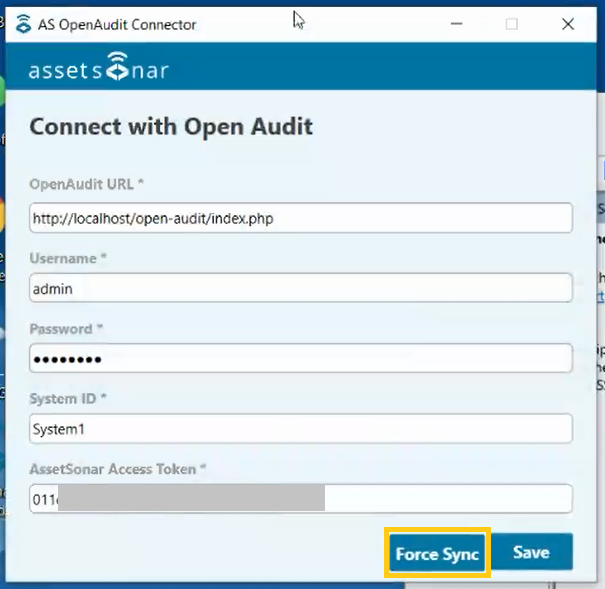
Fill in the given fields. With a pre-configured Connector, you’ll find these fields to be already populated.
- Open-AudIT URL: This is the URL of your Open-AudIT account. It is typically http://localhost/open-audit/index.php.
- Username and password: The username and password by default for your Open-AudIT account will be admin and password respectively. Enter different credentials if you change the default ones while setting up your Open-AudIT account.
- System ID: An important identifier if you’re installing Open-AudIT on multiple servers/locations. Your organization may have multiple locations with multiple networks running at the same time and each location has to have a different installation of Open-AudIT. Sometimes, even individual subnets will need to have their own access to Open-AudIT. In order to successfully sync network data from Open-AudIT into AssetSonar, the System ID must be unique for different installations to identify different executions on different locations, networks, or subnets. For instance, if the System ID for importing device data from the NYC office is ‘NYC Server’, it must be different i.e. ‘Chicago Server’ for data coming in from the Chicago office. This is suggested so that when the connector application sends information to AssetSonar, we know which location it is coming from. In essence, the System ID must be unique for different installations of AssetSonar’s Open-AudIT integration. Note: The System ID must only be set once during setup and should not be changed later.
- AssetSonar Access Token: For the pre-configured Connector application, the token is built into the package so you don’t need to manually type it in. Additionally, you can also access the token from your AssetSonar account by following the pathway: Settings → Add Ons → Network Discovery → Agent Tag.
Note: You must copy-paste the Access Token as it is. Entering an incorrect token will give you the following error message:

However, entering and saving the correct credentials will enable the integration with the success message “Credentials successfully saved”.
Next, click on ‘Force Sync’ to initiate sync of all the Devices that Open-AudIT has scanned. Let’s say your Open-AudIT account has five Discoveries, the endpoint information for all these Discoveries will be pulled into AssetSonar.
With the Connector application, we also install two services into your server.
- ASOpenAuditScheduleService
- ASOpenAuditSyncService
These services run once every hour. The ScheduleService initiates network scans that have been scheduled based on your AssetSonar settings whereas SyncService sends updated data to AssetSonar.
Note: If for some reason an error occurs and some Devices are missed in the scheduled sync so that their data doesn’t reach AssetSonar, you can click the ‘Force Sync’ button from the Connector application. This will sync all the devices running on your network to AssetSonar.
3.2. For Linux server
Upon receiving the Connector application package from our Support team, you’ll find that it contains three files namely ‘install.sh’, ‘connector.tar.gz’, and ‘uninstall.sh’.
Before you begin the installation, consider the following prerequisites.
Ruby 2.2 or higher is required to run the Connector application. Run the following commands to install Ruby.
For apt (Debian or Ubuntu):
- sudo apt-get install ruby-full
- sudo apt-get install build-essential
For yum (CentOS, Fedora, or RHEL):
- sudo yum install ruby
- sudo yum install ruby-devel
- sudo yum install gcc-c++ libstdc++-devel
- sudo yum groupinstall “Development Tools”
Once Ruby is installed, run the following command to install the bundler gem: ‘gem install bundler’.
You’re now ready to begin the installation. Follow the instructions outlined below:
- To install the Connector, open up the Terminal and make the install script executable by running the following command: chmod +x install.sh
- Now, run the script as root using the following command: sudo ./install.sh
- Navigate to /opt/assetsonar-connector and run the following command: bundle install
- Run the following command:
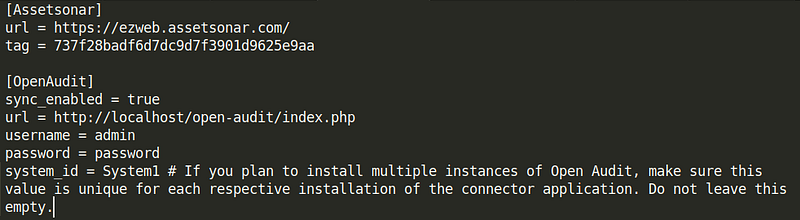
sudo /opt/assetsonar-connector/bin/assetsonar_syncer --generate-config - A configuration file for the Connector application will be generated in “/var/lib/assetsonar-connector/config.ini”. You will need to edit this file and enter the following information as illustrated in the image below:
AssetSonar
- URL with subdomain (e.g. https://<company_name>.assetsonar.com)
- Tag (your assetsonar agent tag from Settings → Open-AudIT → Enabled → Agent Tag)
Open Audit
- Username (the username for your Open-AudIT instance)
- Password (the password for that particular user)
- System_id (If you plan to install multiple instances of Open-AudIT, make sure this value is unique for each respective installation of the Connector application.)
6. By default, the Connector application will sync with AssetSonar once every hour. During this sync, information from the latest scans will be pushed to AssetSonar. If you wish to force sync for all Devices from all the scans, run the following command: sudo /opt/assetsonar-connector/bin/assetsonar_syncer -sf
7. To uninstall the Connector, simply run the uninstall.sh script.
Now, let’s head to the AssetSonar side of the integration!
4. Provision Devices in AssetSonar
For provisioning the synced Devices, go to Settings → Add Ons → Network Discovery and click ‘Enabled’.
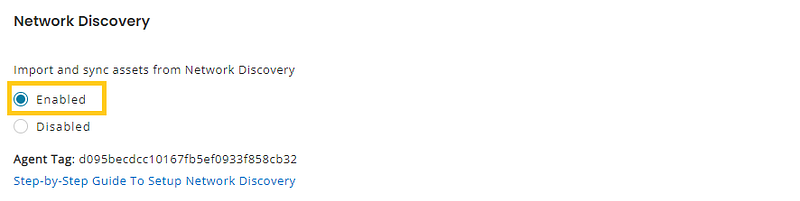
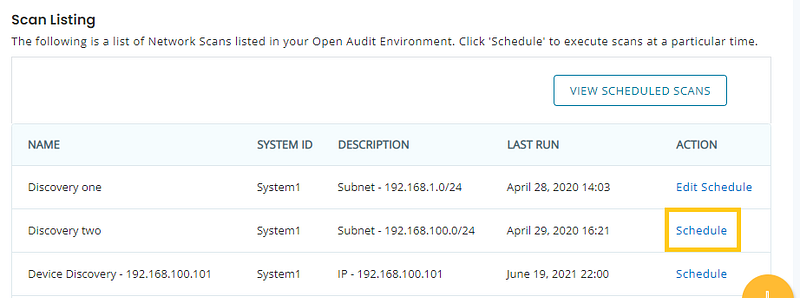
If you scroll below, under the Scan Listings section, you can view all the different discoveries that were created in Open-AudIT and imported into AssetSonar.
Schedule a scan by clicking the highlighted button.
Enter details based on your preference and hit ‘Schedule’.
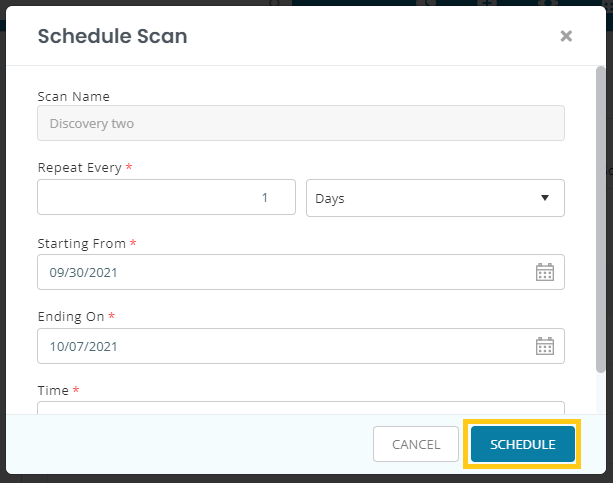
The Connector application will save the schedule on your server when it next contacts AssetSonar and will initiate scans based on that schedule. You can also edit a schedule if you like.
To view the recently imported devices from Open-AudIT, go to Notifications (Bell icon) → Unprovisioned Devices. This will direct you to the Provisioning module in AssetSonar. Here, the Provisioning tab displays the Devices that were synced by the Connector application.
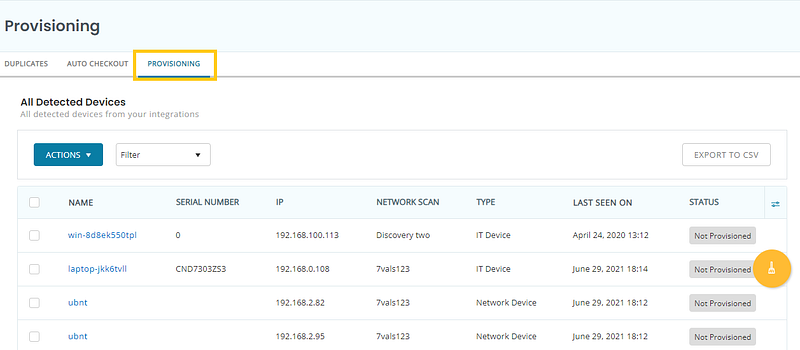
These are all the Devices that were initially scanned by Open-AudIT and have been pulled into AssetSonar. You can verify this information from your Open-AudIT account by going to Manage → Devices → List Devices.

Two primary types of Devices that are imported from Open-AudIT include:
- IT Devices: These are devices that have an OS running on them. They include Linux, Windows, Macbook, and Chromebook computers. IT Devices are provisioned as IT Assets into AssetSonar.
- Network Devices: Network Devices typically include hardware that enables communication and interaction between IT and Mobile Assets. These may include hubs, switches, routers, bridges, etc. Network Devices are provisioned as Network Assets within AssetSonar. To get in-depth information on Network Devices, you must input the SNMP credentials during the Add Credentials (1.2.) stage.
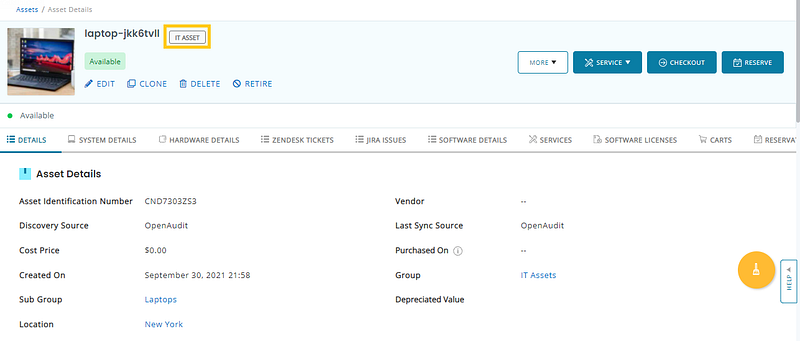
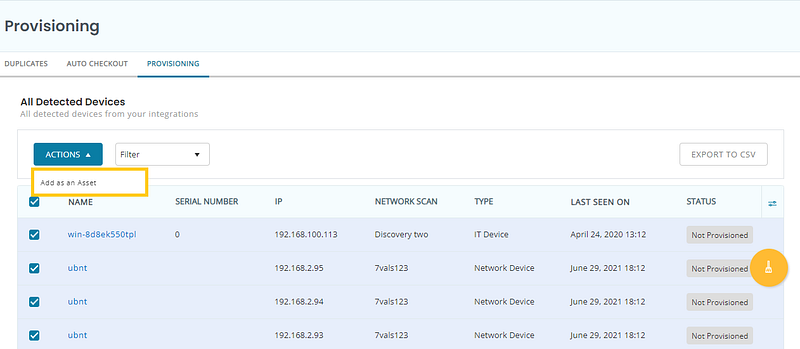
To provision an imported Device, go to its Details page and click on the ‘Add as an Asset’ button.
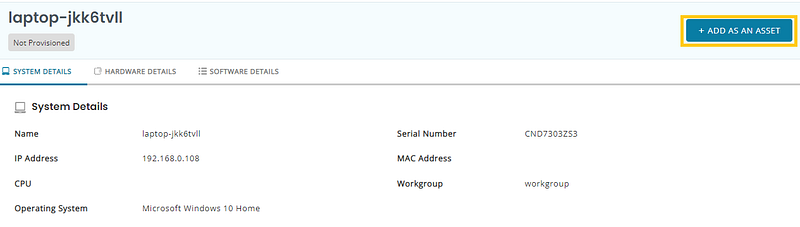
Select the preferred Location and Group and hit ‘Add’. The Device is now permanently provisioned as an IT Asset/Network Asset in AssetSonar.
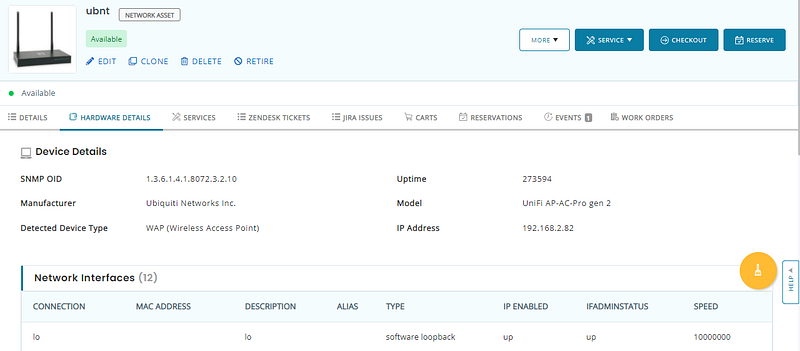
For Network Devices, we typically fetch Hardware Details such as SNMP OID, Uptime, Model, Ports, Connection, IP Enabled, IFAdminStatus, etc.
You can also mass provision Devices from the Listings page as shown:
Furthermore, to see the newly provisioned Devices, you can filter the results based on Detected on Last Scan.
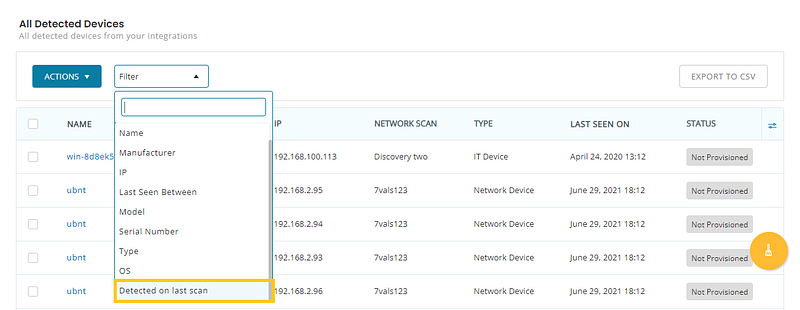
Run the filter using your preferred Discovery Name and hit ‘Submit’. This is how the filtered results will appear.
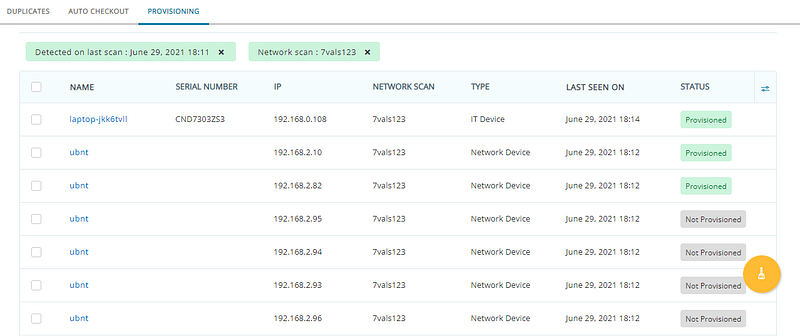
You can see which Devices were provisioned from the latest network scan and which still need provisioning.
4.1. Ignore recommendations
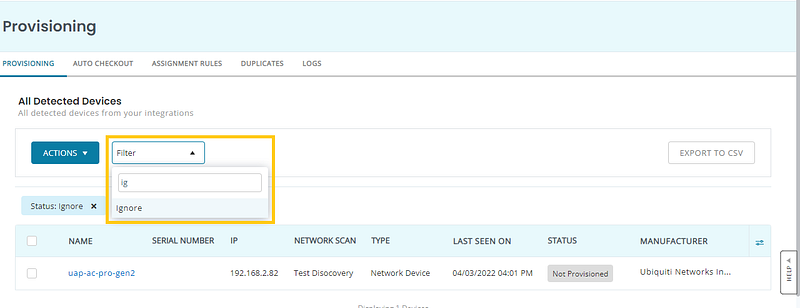
There may be cases where the system shows provisioning recommendations for some obsolete Devices that you do not wish to add to AssetSonar. You can ignore such recommendations.
From the Provisioning tab, select the relevant Devices and click on Actions → Ignore.

The ignored Devices are moved to a new state titled ‘Ignore’. You can filter the Devices by the Ignore status as shown.
If you want to add the ignored Devices back to the Auto Checkout recommendations, you can do so by clicking Actions → Undo Ignore.
5. Run Custom Reports
For detailed insights into network inventory, you can also run Custom Reports on the Network Devices imported from OpenAud-IT. From the AssetSonar dashboard, go to Reports → Create Custom Report.
Step 1: Choose Network Scans as the primary module and Discovered Assets as the related module.
Step 2: Select the relevant columns from previously selected modules for the report
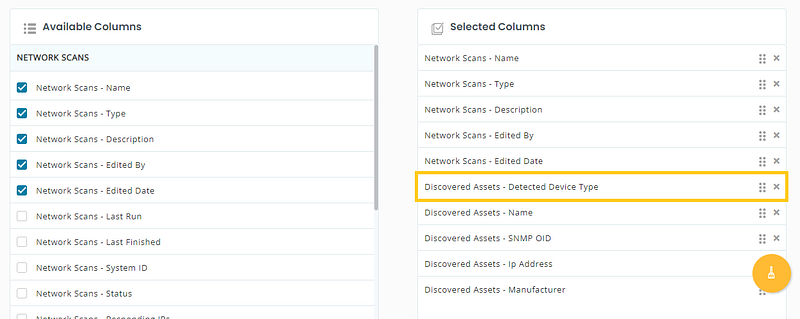
Pro tip! By selecting the Detected Device Type column for your custom report, you can view the respective form factors of Devices imported from within Open-AudIT.
Step 3–6: Carry out as needed based on your use case.
Step 7: Hit ‘Run Report’.

The highlighted column shows that some of the imported Devices are routers (WAPs) whereas others are unclassified. Unclassified devices are ones that aren’t properly scanned and for whom you didn’t have the correct credentials. You typically won’t see Unclassified or Unknown Devices on the Provisioning page, however, they do show up in the Custom Reports for added visibility into which kinds of Assets are on an organization’s network.
That’s all about AssetSonar’s Open-AudIT integration for executing and managing Network Discovery!
If you need more assistance, drop us an email at support@ezo.io.
Discover more with our additional out-of-the-box integrations
About AssetSonar
AssetSonar is the leading hardware asset management software used by IT-intensive organizations and businesses all over the globe. Sign up today for a free 15-day trial.
For more assistance, drop us an email at support@ezo.io. You can also visit our blog for detailed support posts.
Join the Conversation: Twitter | Facebook


