

AssetSonar has a nifty Label Designer that enables you to create and edit item labels according to your specific needs.
Contents
- Creating Print Labels
1.1. Layout and design
1.2. Custom field on Print Label
1.3. Color tags in Print Labels
1.4. Fitting multiple labels on a page - Third-party labels
- Frequently used Avery label templates
1. Creating Print Labels
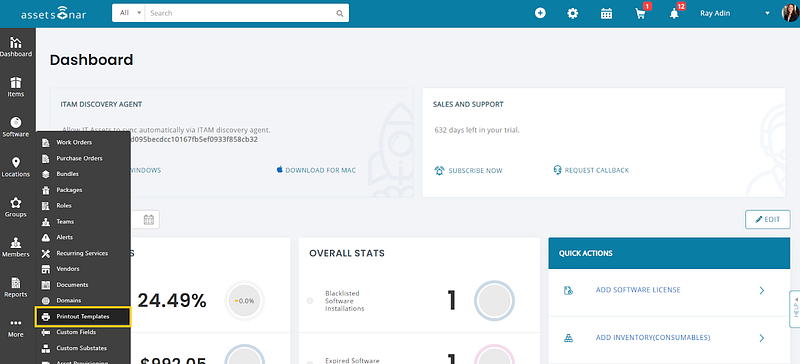
To create print labels, go to More → Printout Templates from the AssetSonar dashboard.
This leads you to the following page:
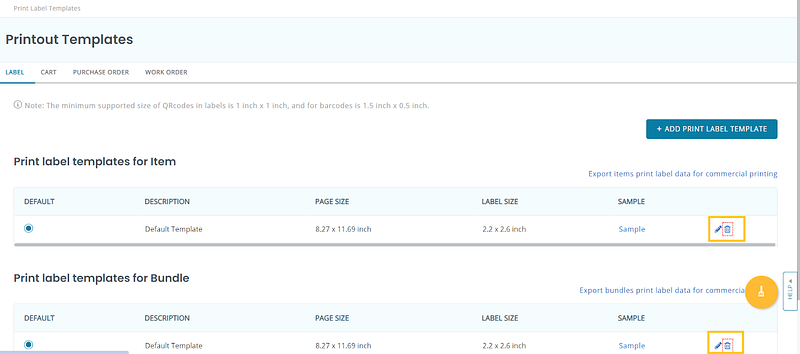
Here, you can edit or delete default templates by clicking on the icons highlighted in the image above.
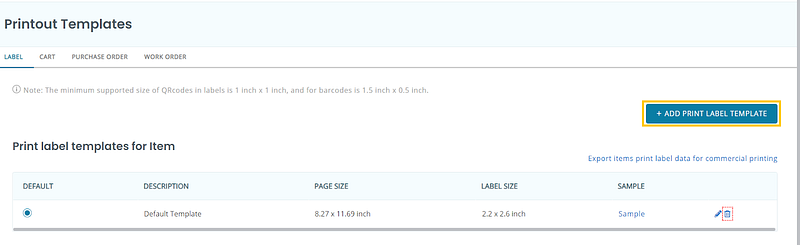
You can also draft a new template from scratch by clicking on the ‘Add Print Label Template’ button.
Print Labels can be created for both items and Bundles.
Before we create a label, let’s look at what AssetSonar’s Label Designer does:
- It is an intuitive, drag-and-drop-based designer. All you have to do is grab a design element and move it to the canvas below.
- You can insert QR Codes, Barcodes, or both on a print label for scanning purposes.
- All of an Asset’s predefined fields can be printed on a label.
- You can also print custom attributes (in the text, date, or paragraph format) on the item label.
- Rich formatting can be applied to data fields by double-clicking on an element’s data box.
- You can insert free-form text and easily apply styles like fonts, size, rotation, and alignment.
- Your company logo can also be inserted into the label.
1.1. Layout and design
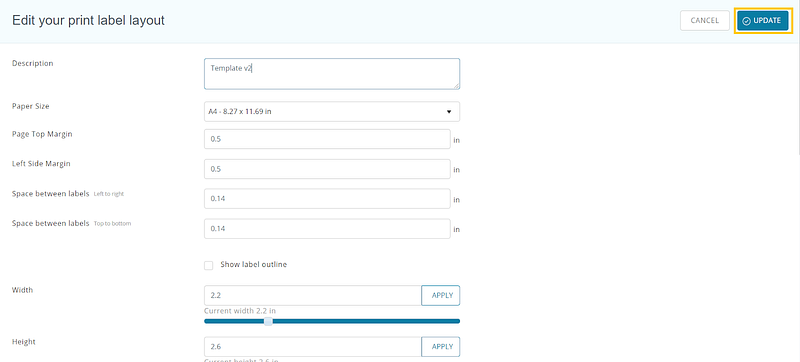
Once you open the Print Label template, you’ll see various layout options. You can choose aspects like the paper size, margins, and the space you’d like to leave between each label. Label dimensions can also be edited by sliding the width and height scale or inputting the values manually.
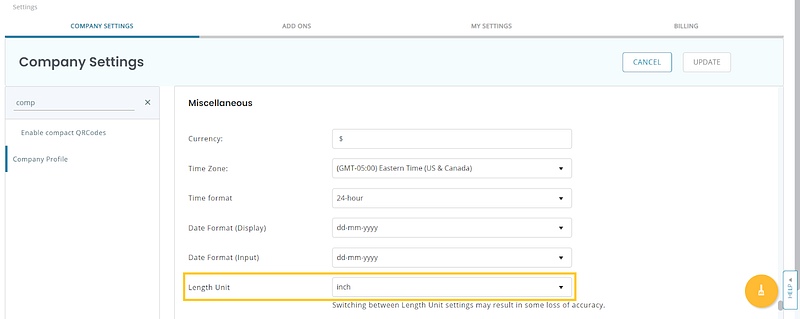
By default, the measurement unit is set to inches. However, you can change it to centimeters from Company Settings → Company Profile → Standards and Formats → Length unit → Centimeters.
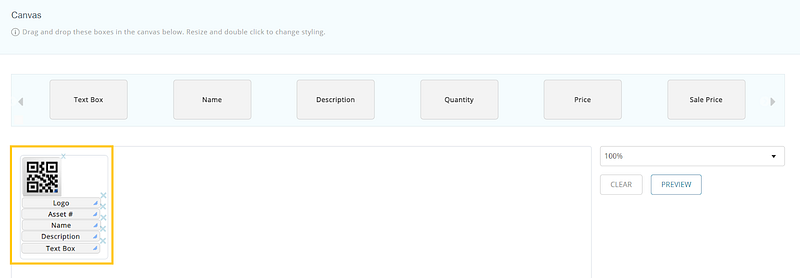
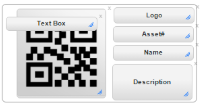
If you scroll below on the Edit Print Label Template page, you can see the canvas of the label designer. Simply drag the fields and arrange them onto the label as you see fit.
The screenshot below shows a newly designed template for a label. It includes a QR Code, the company logo, asset number, name, description, as well as a rotated text box. You can also add a URL if you like.
How to style an element? You can double-click on an element to resize or change its style. A dialogue box for settings normally shows up.
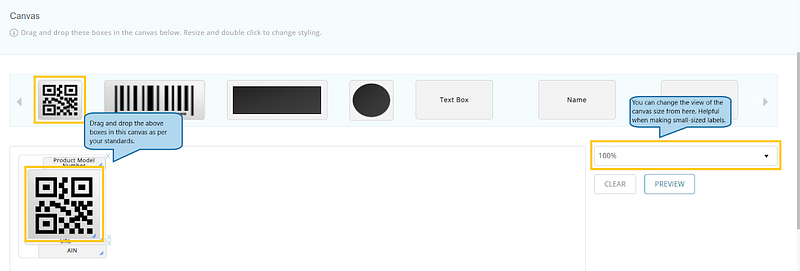
How to resize the canvas to fit small labels? If a user wants to fit all the elements/text boxes for all the fields they want, it becomes difficult to do this in a properly aligned manner. To tackle this, you can resize the view of the canvas, say keep it to 200%, for a larger view. This will help you make small-sized labels with more precision.
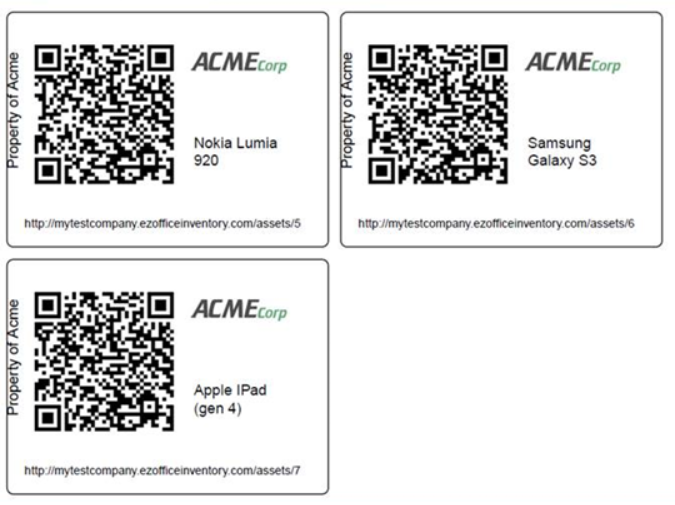
Note: Rotated pictures only show up as rotated once you click the ‘Preview’ or ‘Create’ buttons. It might seem like it is obscuring another label element (as shown below), but you can adjust the placement using the preview.
When previewed in the designer or rendered while printing, the label displays as shown in the image below.
1.2. Custom field on Print Label
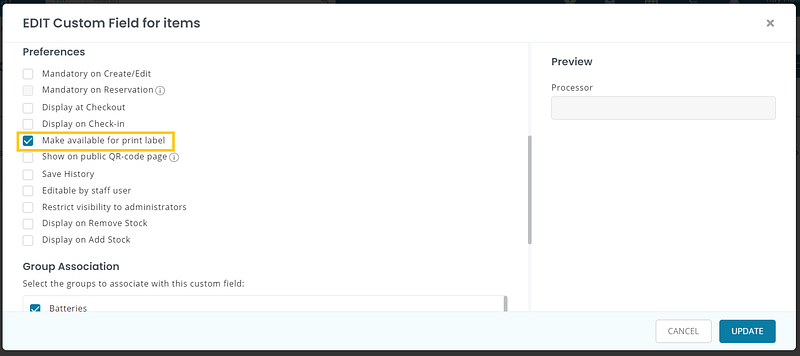
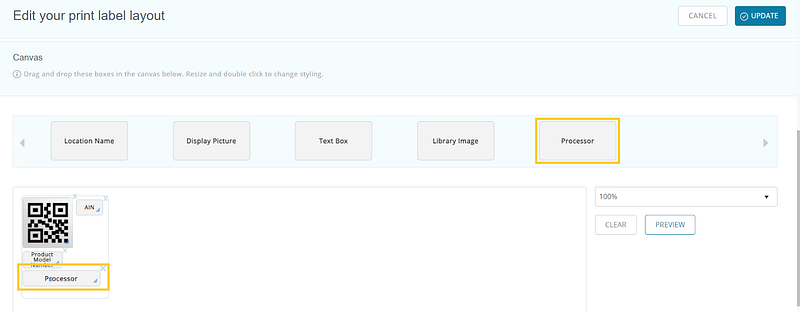
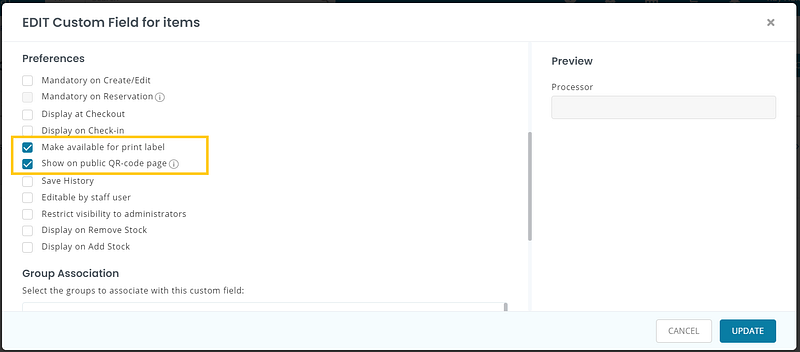
You can print any custom field on a Print Label. Please note that for the custom field to appear on the label designer as an element, you have to go to the particular custom field, click ‘Edit’ and select the ‘Make available for print label’ option.
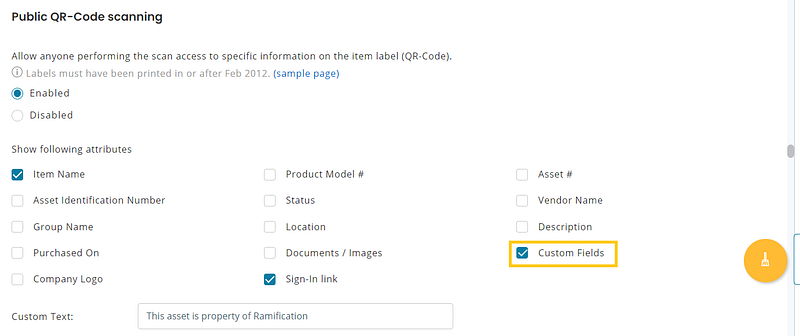
You can also have a custom field shown when someone scans the QR Code for an IT Asset. Enable this from Company Settings → Public QR Code Scanning → Enabled and select ‘Custom Fields’.
Please make sure that you have the relevant preferences selected while creating/editing a custom field.
Learn more: [How-to] Use Custom Fields in AssetSonar
1.3. Color tags in Print Labels
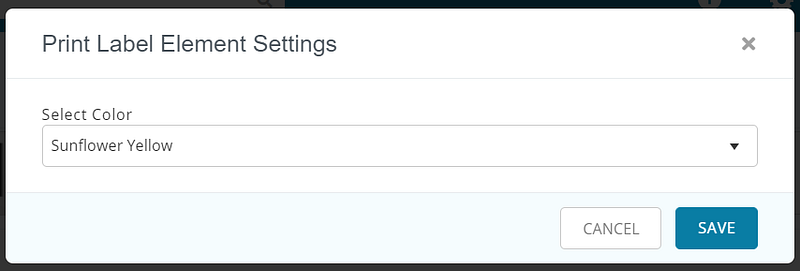
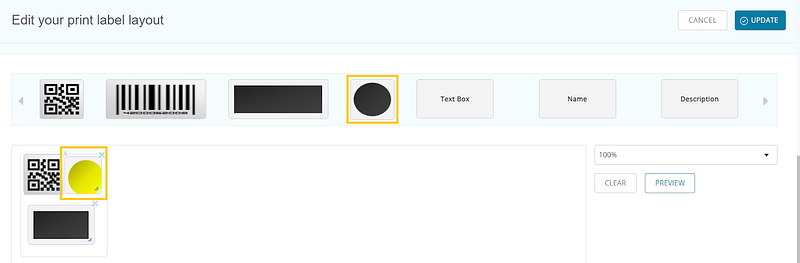
AssetSonar also enables you to add color tags to the Print Labels. You can choose from 9 different colors and 2 shapes (rounds and bars). Pick the shapes from the list of available design elements and drag them onto the designing canvas. Double-click on a shape to change color. Select the relevant color and hit ‘Save’.
This comes in handy when you quickly want to identify an item’s category by looking at the label. Let’s say you want to differentiate between Windows laptops and Macbooks. Prepare one set of Print Label templates for yellow and the other for blue. Use the yellow ones to tag Windows laptops and the blue ones for tagging Macbooks.
1.4. Fitting multiple labels on a page
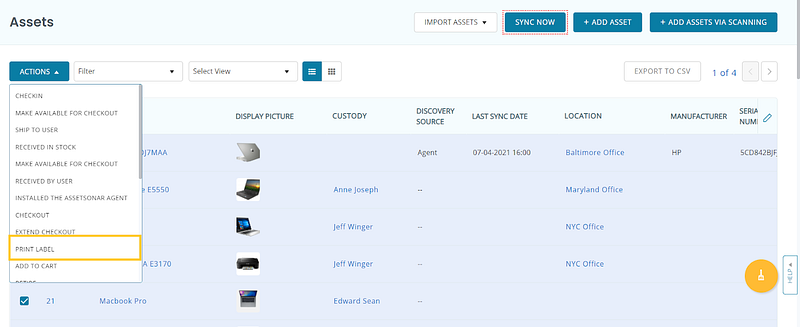
AssetSonar gives you the ability to arrange and fit multiple labels on the same page. Select multiple Assets from the Asset Listings page, and choose ‘Print Label’ from the actions menu as shown below.
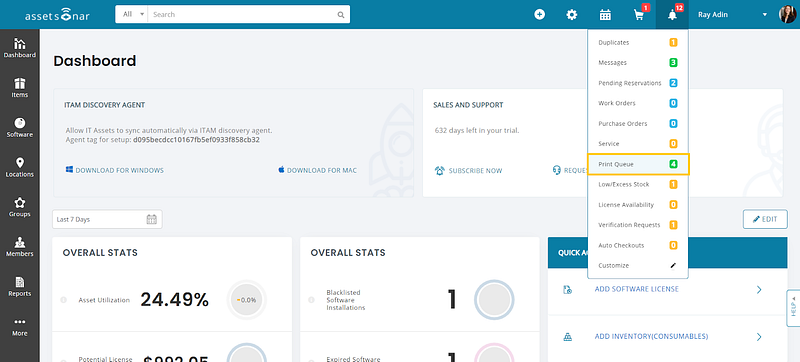
You can achieve the same effect by going to the Notifications Bell → Print Queue.
Deselect the ‘Enable Single Step Printing’ option.
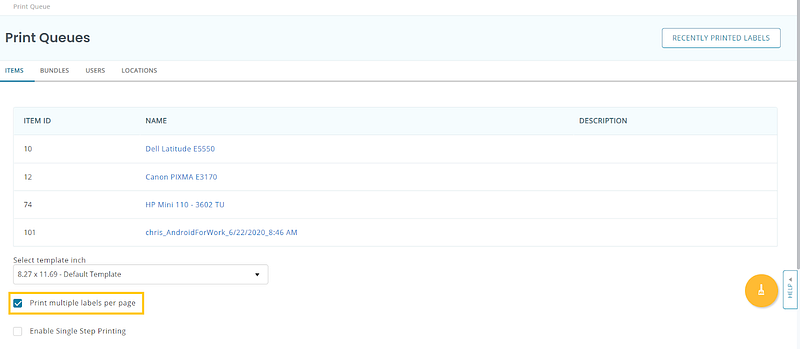
This allows you to fill up the print queue before explicitly taking the print action on the print queue. This means you can put multiple labels on one page, and review them before you actually print them.
2. Third-party Labels
Sticky paper is great for a quick job on printing asset labels as well as doing a trial run before ordering the more expensive commercial-grade labels (e.g. stickers or aluminum labels). You can purchase Avery and Avery-compatible sticky papers from big box stores like Staples or OfficeMax. Moreover, most of the big box stores offer online printing services i.e. simply generating your labels from AssetSonar. You can ‘export’ and send over the PDF file containing the Asset labels to the printing service online. Go to the store at your leisure and pick up your printed labels. Details on exporting data for commercial printing.
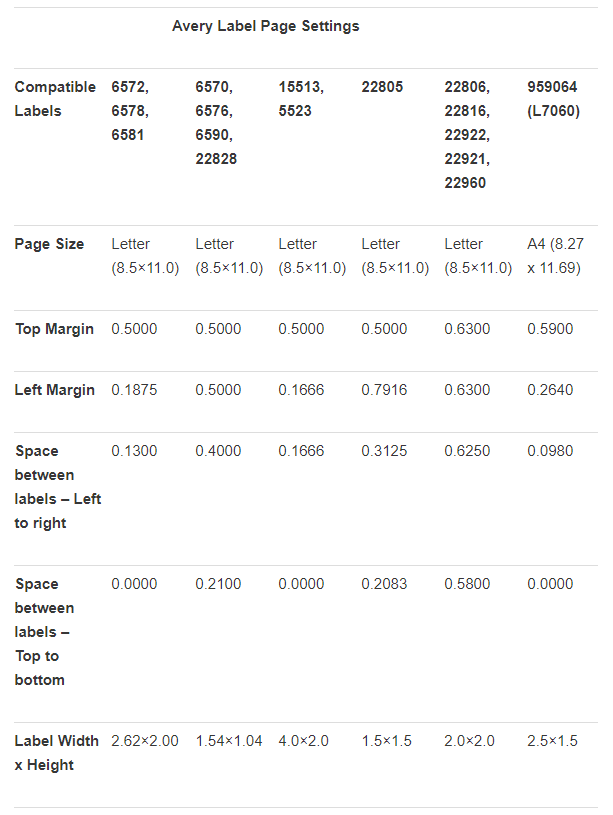
AssetSonar is compatible with Avery Labels — the most well-known in the industry, and we offer quite a few Label-Avery templates. Refer to the end of this post for our most frequently used Avery templates.
Depending on your use cases, availability, and cost constraints, you may want to have a look at this blog post before deciding on your label design and materials.
3. Frequently used Avery label templates
Below, we list some of the most frequently used Avery templates.
*The following values are in inches.
You can configure a new template by going to More → Printout Templates. You can now enter the template values in the margins and space fields.
There may be some cases where the label you’re designing is smaller than the area taken by the design elements placed on the canvas. You’d need to delete these elements (from the x on the top of every element) or re-size them. This is because the entire label cannot be smaller than the elements inside that label.
Check out this site for more accurate dimensions for Avery Labels.
Here’s a list of recommended hardware integrations you can use for Barcode and QR code scanning of Avery labels.
Looking for some more answers? Check our FAQs section or email at support@ezo.io.
About AssetSonar
AssetSonar is a powerful hardware asset management software used by IT-intensive organizations and businesses all over the globe. Sign up today for a free 15-day trial.
Join the Conversation: Twitter | Facebook


